vuepress2.0安装与使用教程
一、确保Git、Node安装完毕
Windows PowerShell
Copyright (C) Microsoft Corporation. All rights reserved.
Install the latest PowerShell for new features and improvements! https://aka.ms/PSWindows
PS C:\Users\Jason> node -v
v20.12.1
PS C:\Users\Jason> git -v
git version 2.41.0.windows.3
二、安装pnpm
如果出现1 package is looking for funding run npm fund for details,可以在cmd窗户执行Set-ExecutionPolicy RemoteSigned修改当前策略,然后就可以执行pnpm包的安装啦。
npm config set registry http://registry.npmmirror.com
npm install pnpm -g
三、安装vuepress
进入桌面的vuepress文件夹,运行pnpm create vuepress kelsen,其中kelsen为项目名。
PS C:\Users\Jason> cd .\Desktop.\vuepress
PS C:\Users\Jason\Desktop\vuepress> pnpm create vuepress kelsen
.../Local/pnpm/store/v3/tmp/dlx-19276    |  +84 ++++++++
.../Local/pnpm/store/v3/tmp/dlx-19276    | Progress: resolved 84, reused 0, downloaded 84, added 84, done
? Select a language to display / 选择显示语言 简体中文
? 选择包管理器 pnpm
? 你想要使用哪个打包器? vite
? 你想要创建什么类型的项目? blog
生成 package.json...
? 设置应用名称 kelsen
? 设置应用版本号 0.0.1
? 设置应用描述 A VuePress project
? 设置协议 MIT
? 是否需要一个自动部署文档到 GitHub Pages 的工作流? Yes
生成模板...
安装依赖...
这可能需要数分钟,请耐心等待.
我们无法正确输出子进程的进度条,所以进程可能会看似未响应
Packages: +221
++++++++++++++++++++++++++++++++++++++++++++++++++++++++++++++++++++++++++++++++++++++++++++++++++++++++++++++++++++++
Progress: resolved 280, reused 23, downloaded 198, added 221, done
node_modules/.pnpm/vue-demi@0.14.7_vue@3.4.21/node_modules/vue-demi: Running postinstall script, done in 118ms
node_modules/.pnpm/esbuild@0.19.12/node_modules/esbuild: Running postinstall script, done in 167ms
node_modules/.pnpm/esbuild@0.20.2/node_modules/esbuild: Running postinstall script, done in 164ms

devDependencies:
+ @vuepress/bundler-vite 2.0.0-rc.7
+ @vuepress/plugin-blog 2.0.0-rc.24
+ @vuepress/theme-default 2.0.0-rc.24
+ vue 3.4.21
+ vuepress 2.0.0-rc.9

 WARN  Issues with peer dependencies found
.
└─┬ vuepress 2.0.0-rc.9
  └── ✕ unmet peer @vuepress/bundler-vite@2.0.0-rc.9: found 2.0.0-rc.7

Done in 6.8s
模板已成功生成!
? 是否想要现在启动 Demo 查看? Yes
启动开发服务器...
启动成功后,请在浏览器输入给出的开发服务器地址(默认为 'localhost:8080')

> kelsen@0.0.1 docs:dev C:\Users\Jason\Desktop\vuepress\kelsen
> vuepress dev docs

  vite v5.0.13 dev server running at:

  ➜  Local:   http://localhost:8080/
  ➜  Network: http://192.168.75.1:8080/
  ➜  Network: http://192.168.169.1:8080/
  ➜  Network: http://192.168.0.153:8080/
点击链接,此时显示VuePress 2 介绍页

停掉之后想要重新启动,可以进入到项目目录kelsen,然后运行pnpm docs:dev。
打开comet文件夹,新建.gitignore文件(git忽略目录)
#ide
*.DS_Store
.idea
.vscode

#npm
package-lock.json
yarn.lock

#build result
dist
lib
docs/.vuepress/.temp
docs/.vuepress/.cache
docs.vuepress/dist

# Logs
logs
*.log
npm-debug.log*
yarn-debug.log*
yarn-error.log*
lerna-debug.log*

# Runtime config
pids
*.pid
*.seed
*.pid.lock

# Directory for instrumented libs generated by jscoverage/JSCover
lib-cov

# Coverage directory used by tools like istanbul
coverage

# Compiled binary addons (https://nodejs.org/api/addons.html)
build/Release

# Dependency directories
node_modules

# Optional npm cache directory
.npm

# Optional eslint cache
.eslintcache

# Optional REPL History
.node_repl_history

# Output of 'npm pack'
*.tgz

# Yarn Integrity file
.yarn-integrity

# dotenv environment variables file
.env

#lerna-changelog
.changelog

#vscode history extension
.history
四、目录结构
├── dist                 输出【见配置篇】,位置可自定义
├── node_modules
├── docs
|  ├── .vuepress
|  |  ├── config.ts      配置【见配置篇】
|  |  ├── public        【静态资源】
|  |  └── styles         自定义样式  【见美化篇】
|  ├── Guide            【子版块】文件夹,名字任意
|  |  └── README.md     【子版块】首页
|  ├── README.md        【主页】
|  └── en                英文语言,名字任意,可选
|     └── README.md      对应语言首页
├── package.json         依赖项目录
├── deploy.sh            Github【部署方式1,见部署篇】
├── .github              Github【部署方式2,见部署篇】
|  └── workflows
|     └── main.yml
├── .gitignore           git忽略目录
欲求其解,必窥其内。文档项目配置📁.vuepress包含以下内容
📁.vuepress
├── 📂 .cache git 已忽略
│  └──……
├── 📂 public 静态文件夹
│   └── comet.png
├── 📂 .temp git已忽略
│  ├── internal
│   │   ├── clientConfigs.js客户端配置
│   │   ├── pagesComponents.js页面组件
│   │   ├── pagesData.js
│   │   ├── pagesRoutes.js 页面路由,不明白的看安装篇-路由
│   │   ├──siteData.js
│   │   └── themeData.js
│   ├── pages
│   │   ├── 404.html.js
│   │   ├── 404.html.vue
│   │   ├── C
│   │   │   ├── index.html.js 子模块首页
│   │   │   └── index.html.vue
│   │   ├── index.html.js首页,也就是站点README.md内容
│   │   └── index.html.vue
│   ├── styles
│   │   ├── index.scss样式文件
│   │   └── palette.scss
│   └── vite-root
│       └── index.html
└── 📋 config.ts 亟待完成的配置文件打开项目文件夹,编辑package.json。以下内容可选,SEO需要这些,不需要的话可以跳过
"keywords": [
    "Java教程",
    "Java工程师训练营",
    "Java后端工程师"
  ],
"author": "Kelsen",
"homepage": "www.huerpu.cc",
"repository": {
    "type": "git",
    "url": "http://www.huerpu.cc:2080/"
},
五、搭建文档首页
Vuepress使用相对路径描述文件位置,再转化为路由路径(这个我们不用管),下表展示了二者的对应关系
| 相对路径 | 路由路径 |
|---|---|
| /README.md | / |
| /index.md | / |
| /about.md | /about.html |
| /vue/README.md | /vue/ |
相对路径里README.md和index.md都会转化成index.html,两者同一层级时会冲突的
换句话说,README.md和index.md不能在一个文件夹共存
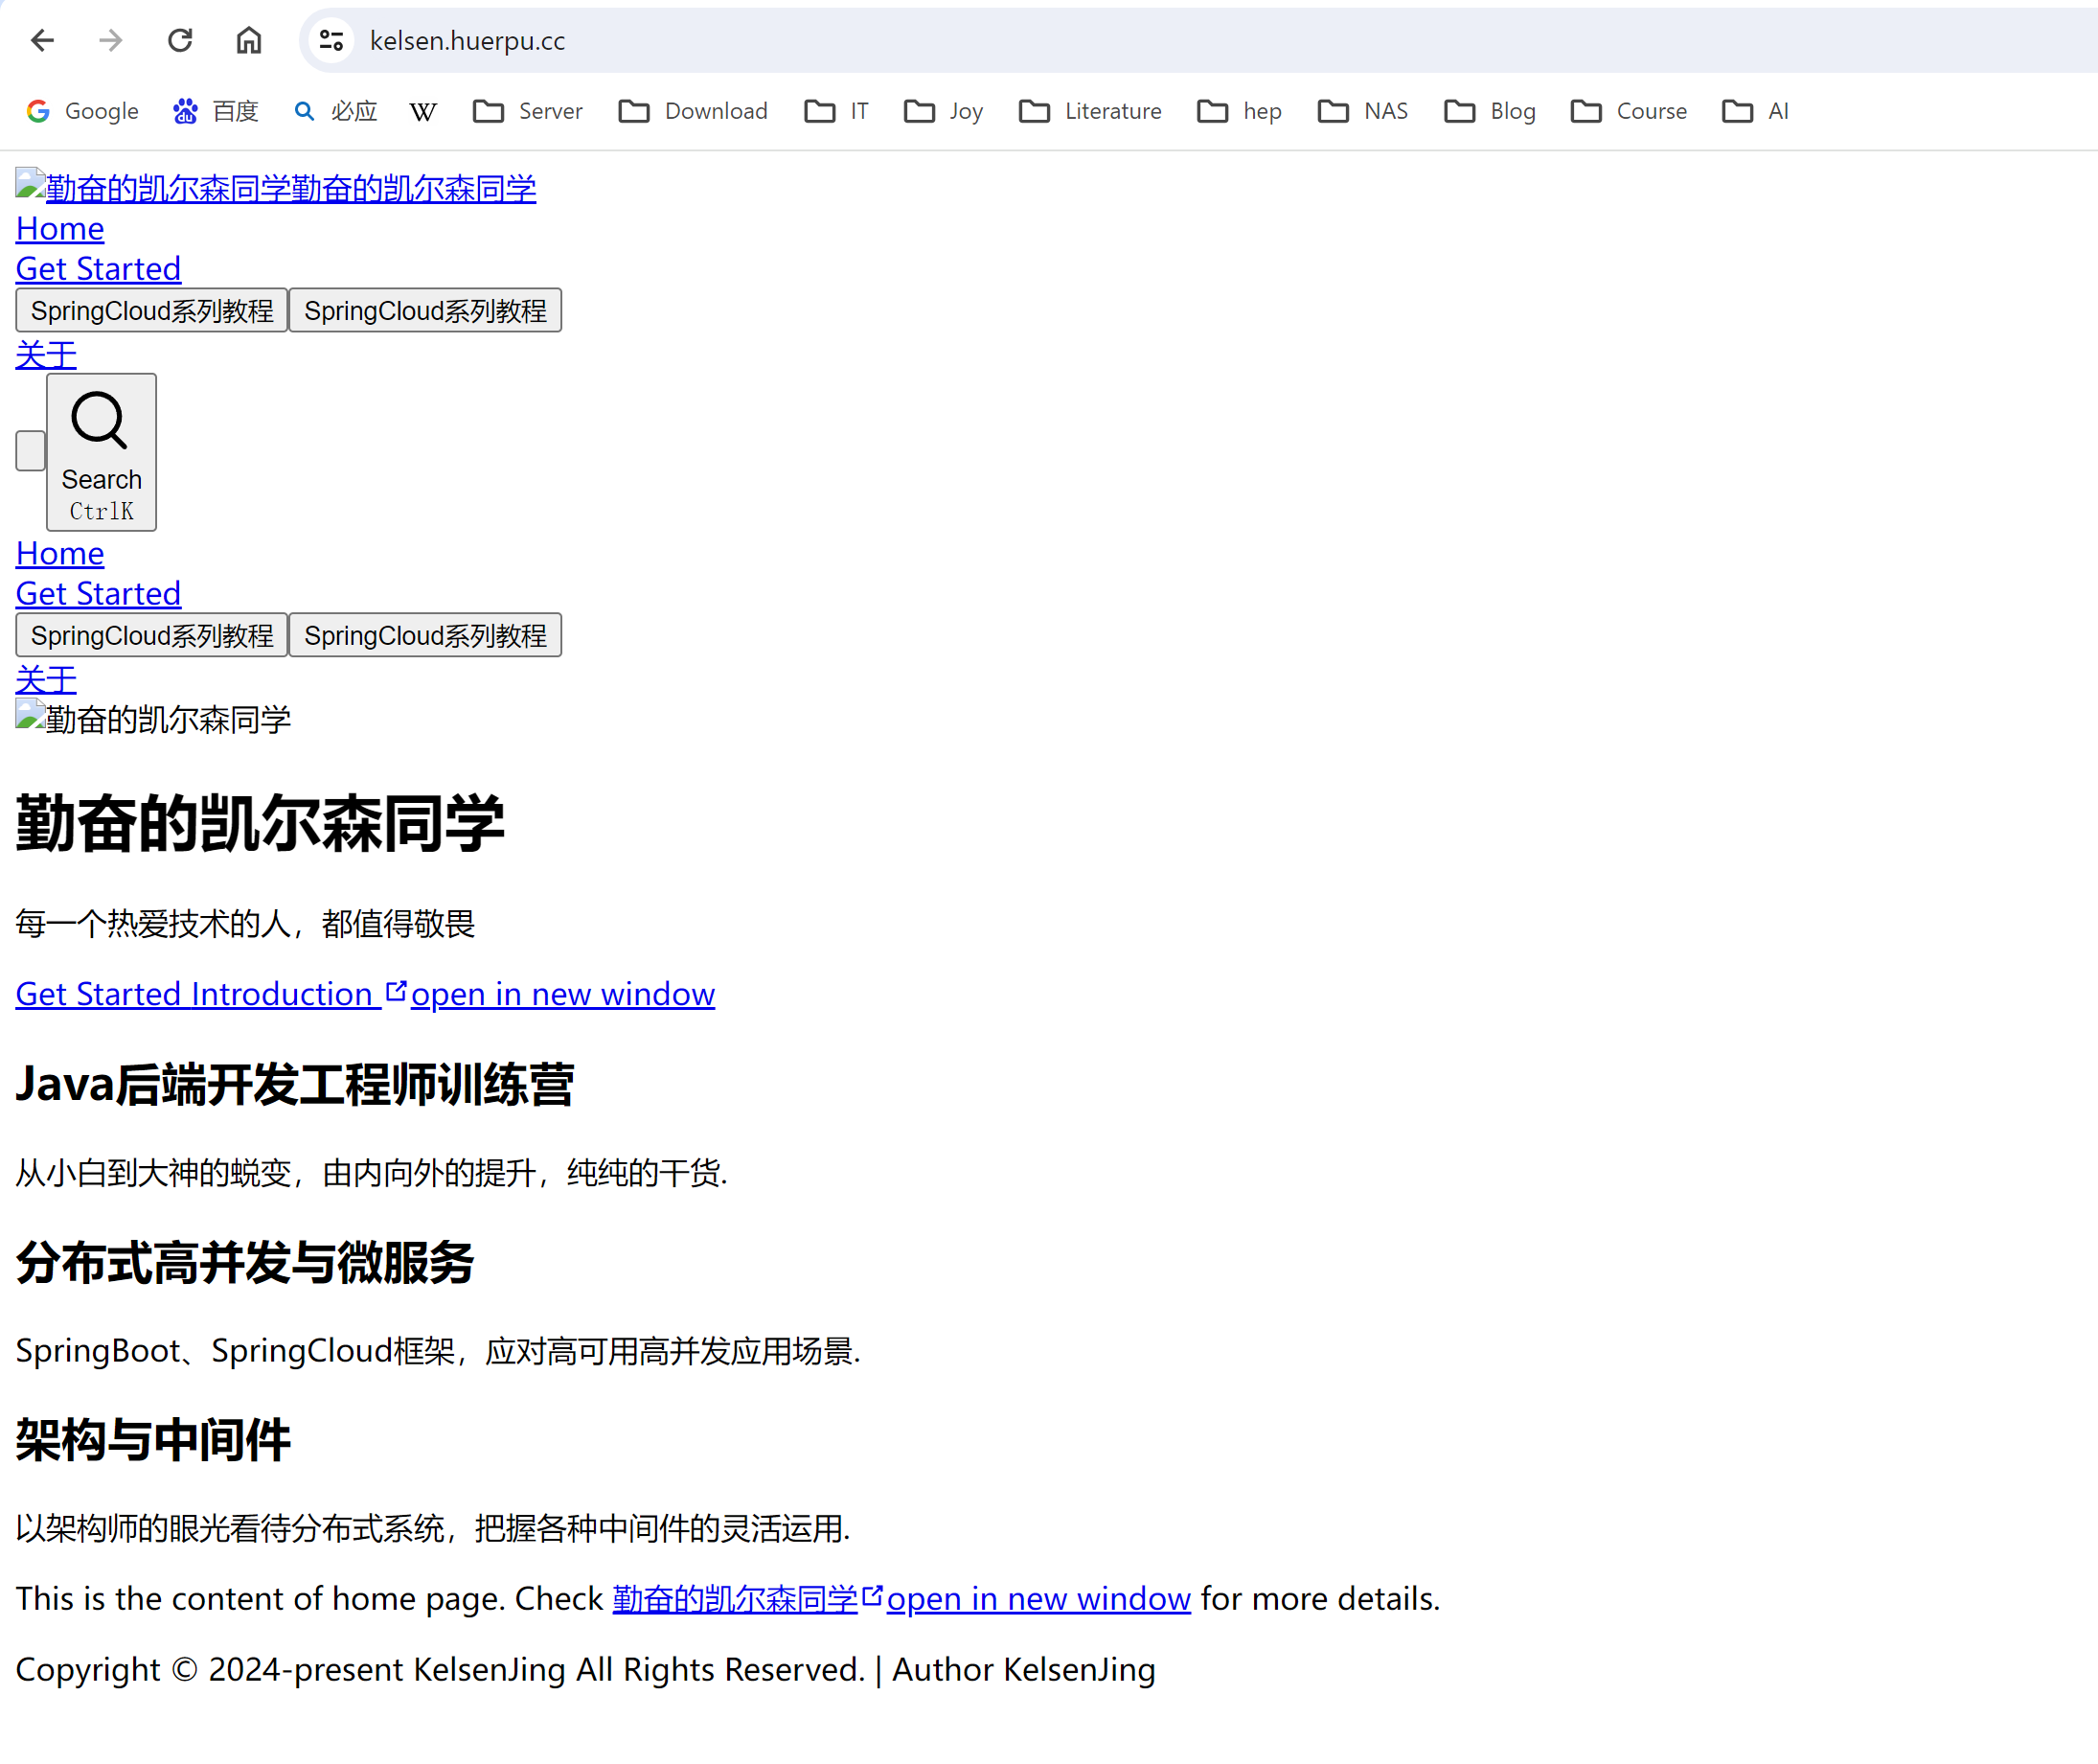
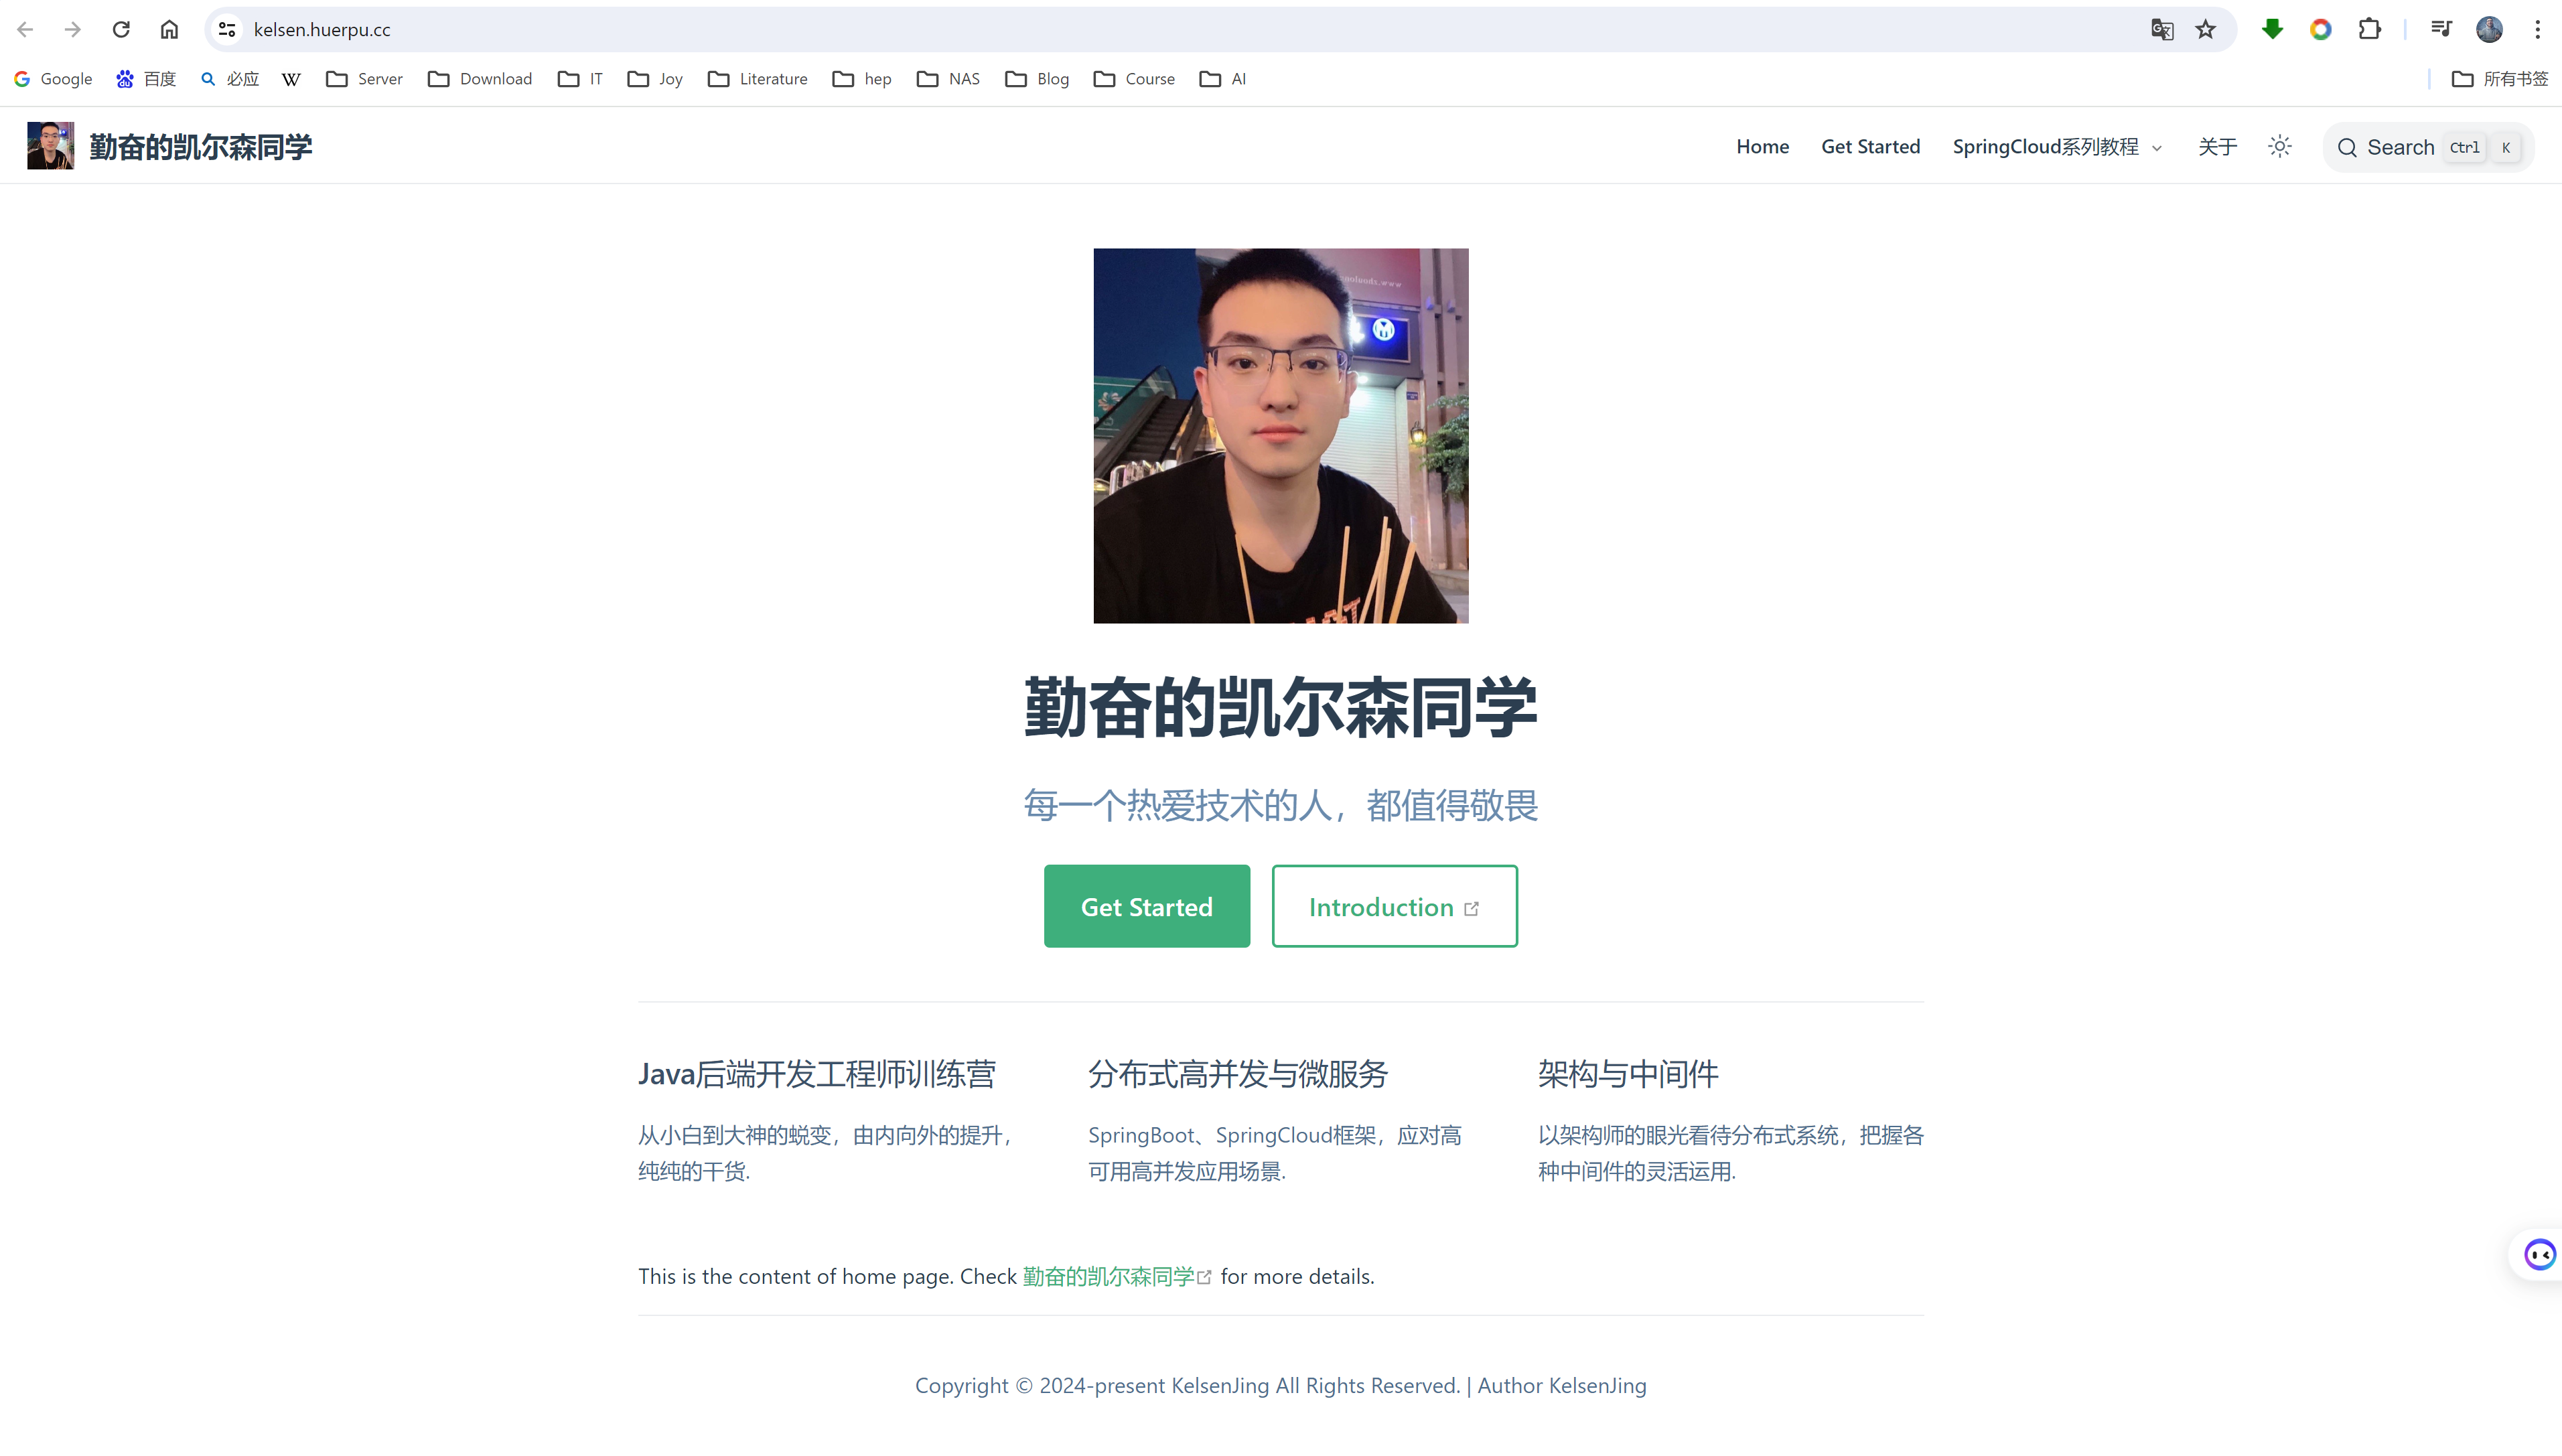
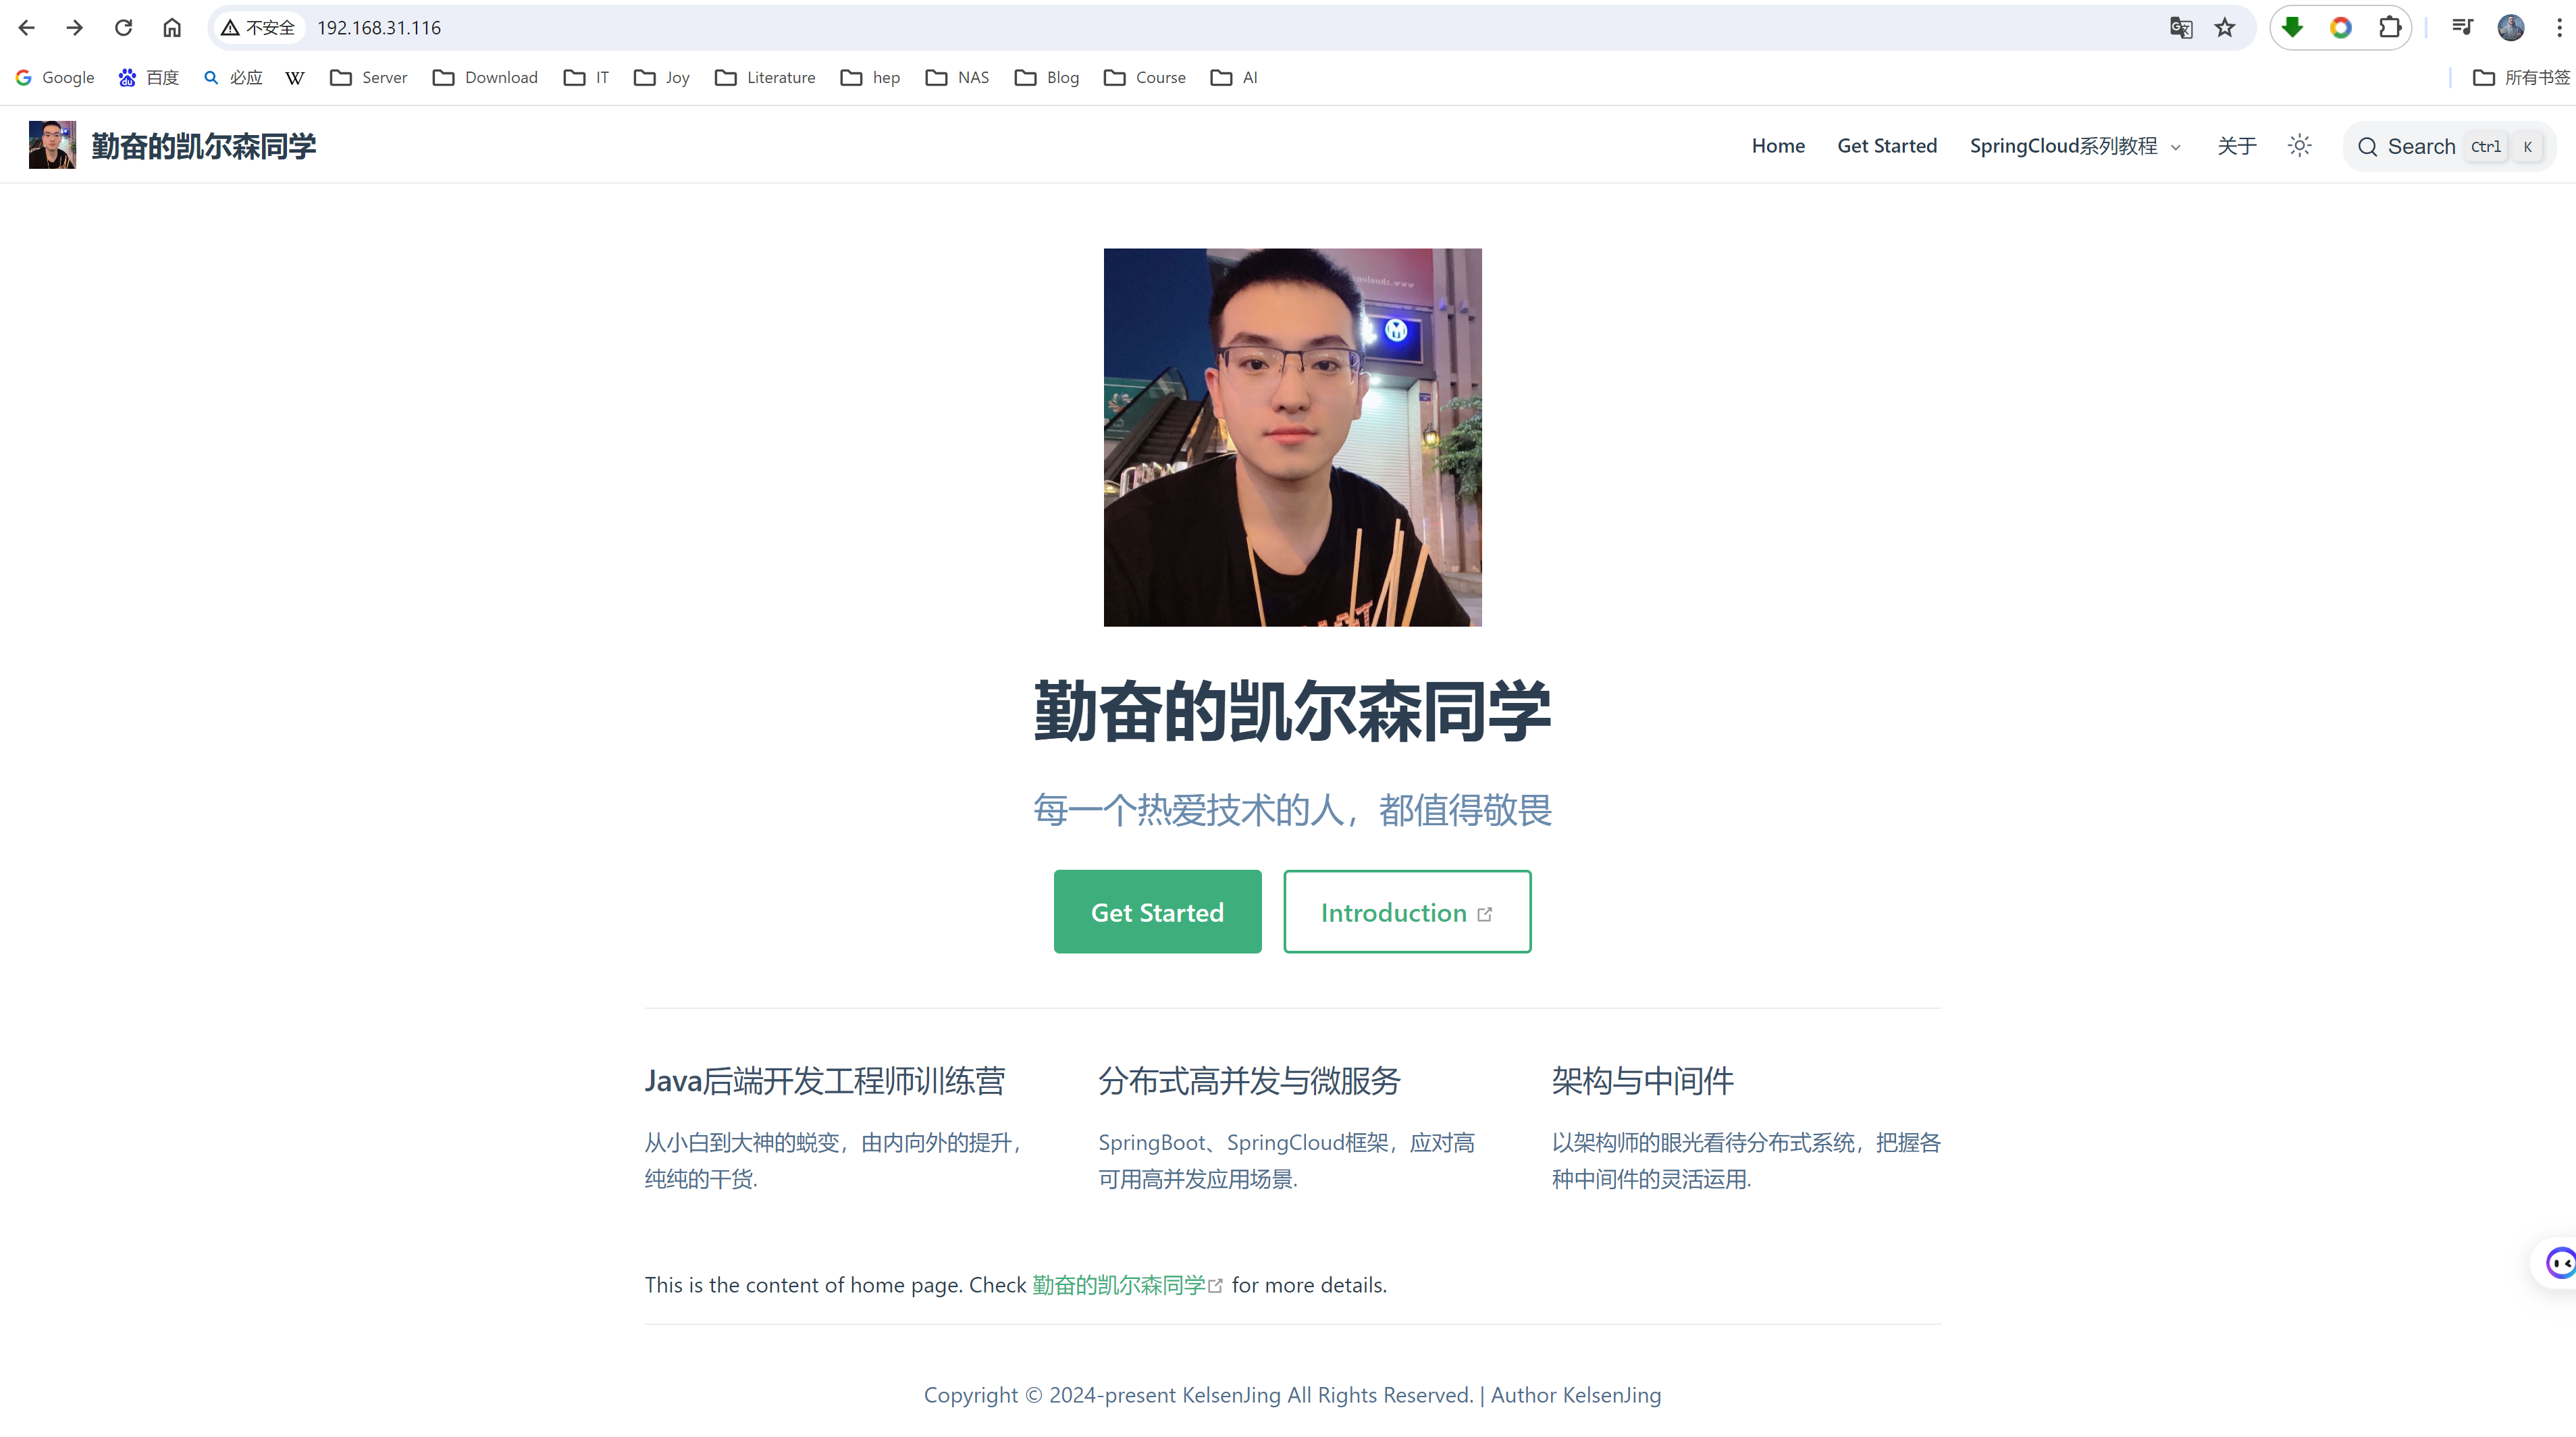
在📁docs文件夹内部修改README.md,功能说明如下
| 名称 | 含义 |
|---|---|
| home | 判断是否是首页 |
| heroImage | 首页logo图,支持svg、png、gif、jpg |
| heroText | 首页标题 |
| tagline | 首页标语 |
| actions | 按钮,text和link可以多个 |
| text | 按钮文字 |
| link | 按钮链接,子版块文件夹名 |
| features | 文档分栏,title和details数量自定 |
| footer | 文档底部板块 |
5.1 首页标题和标语
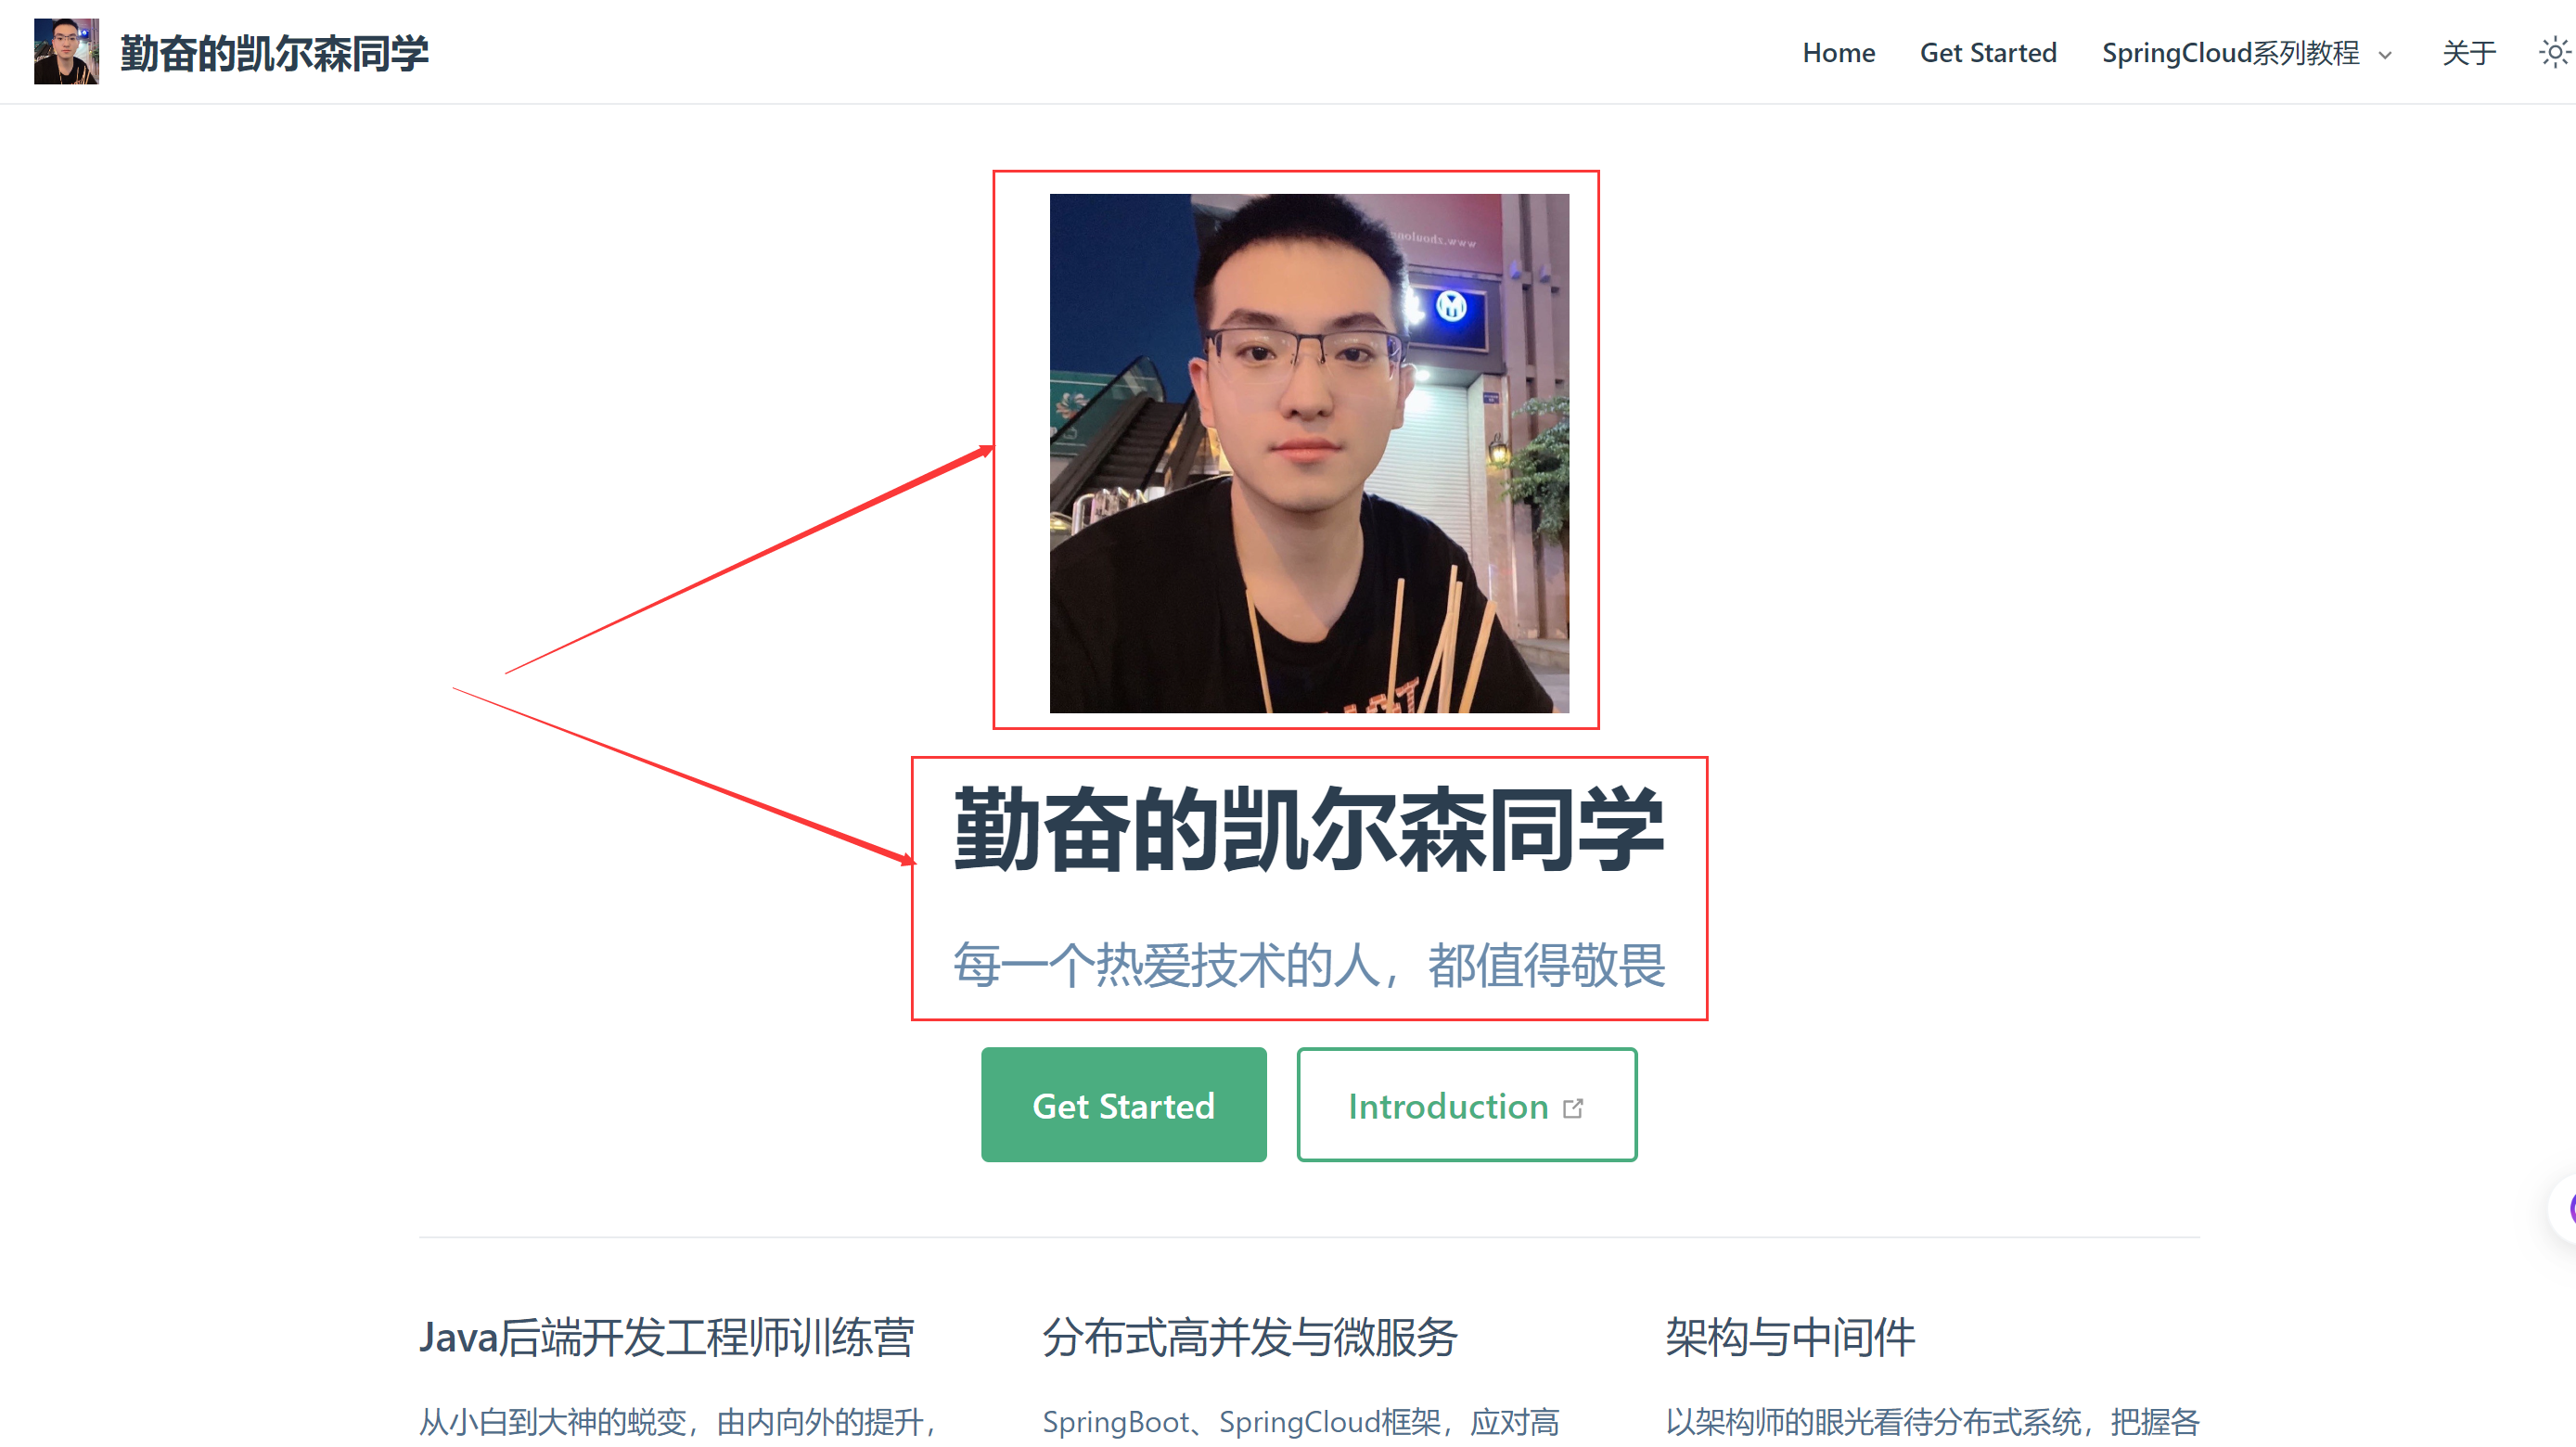
📁.vuepress文件夹内新建📁public文件夹,放入kelsen.png和favicon.ico文件,heroImage: /kelsen.png设置为kelsen的头像,heroText和tagline分别为首页标题和标语。
5.2 Logo设置
在defineUserConfig下修改title为'勤奋的凯尔森同学',在defaultTheme下增加一个logo路径
export default defineUserConfig({
  lang: 'en-US',
  title: '勤奋的凯尔森同学',
  description: 'KelsenJing VuePress Site',
  permalink: "/:slug",
  theme: defaultTheme({
    logo: '/kelsen.png',
})
显示效果如下

5.3 站点图标设置
在config.js中增加信息,指向一个美女的图片,图片存在public文件夹下。
export default defineUserConfig({
  head: [['link', { rel: 'icon', href: '/beauty.jpg' }]],
})
显示效果如下

修改完成的文件如下
---
home: true
title: Home
heroImage: /kelsen.png
heroText: 勤奋的凯尔森同学
tagline: 每一个热爱技术的人,都值得敬畏

actions:
  - text: Get Started
    link: /get-started.html
    type: primary

  - text: Introduction
    link: https://vuejs.press/guide/introduction.html
    type: secondary

features:
  - title: Java后端开发工程师训练营
    details: 从小白到大神的蜕变,由内向外的提升,纯纯的干货.
  - title: 分布式高并发与微服务
    details: SpringBoot、SpringCloud框架,应对高可用高并发应用场景.
  - title: 架构与中间件
    details: 以架构师的眼光看待分布式系统,把握各种中间件的灵活运用.

footer: Copyright © 2024-present KelsenJing All Rights Reserved. | Author KelsenJing
---

This is the content of home page. Check [勤奋的凯尔森同学][default-theme-home] for more details.

[default-theme-home]: http://www.huerpu.cc
import { defaultTheme } from '@vuepress/theme-default'
import { defineUserConfig } from 'vuepress/cli'
import { viteBundler } from '@vuepress/bundler-vite'
export default defineUserConfig({
lang: 'en-US',
title: '勤奋的凯尔森同学',
description: 'KelsenJing VuePress Site',
permalink: "/:slug",
head: [['link', { rel: 'icon', href: '/beauty.jpg' }]],
theme: defaultTheme({
logo: '/kelsen.png',
navbar: [
'/',
'/get-started',
],
}),
bundler: viteBundler(),
})六、二级菜单设置
在📁docs文件夹新建文件夹Spring Cloud(Finchley版本)系列教程和Spring Cloud(Kilburn 2022.0.2版本)系列教程,两个文件夹下存放对应的md文件教程。修改config.js文件,在navbar下增加对应的二级菜单,text标识显示的文字,link标识对应文件夹下的md文件。
import { defaultTheme } from '@vuepress/theme-default'
import { defineUserConfig } from 'vuepress/cli'
import { viteBundler } from '@vuepress/bundler-vite'

export default defineUserConfig({
  lang: 'en-US',

  title: '勤奋的凯尔森同学',
  description: 'KelsenJing VuePress Site',
  permalink: "/:slug",

  theme: defaultTheme({
    logo: '/kelsen.png',

    navbar: [
       '/',
      '/get-started',

      {
        text: 'SpringCloud系列教程',
        children:
            [
              {
                text: 'Spring Cloud(Finchley版本)系列教程',
                children:
                    [
                      { text: 'Spring Cloud(Finchley版本)系列教程(一) 服务注册与发现(eureka)', link: '/Spring Cloud(Finchley版本)系列教程/Spring Cloud(Finchley版本)系列教程(一) 服务注册与发现(eureka).md' },
                      { text: 'Spring Cloud(Finchley版本)系列教程(二) 客户端负载均衡Ribbon', link: '/Spring Cloud(Finchley版本)系列教程/Spring Cloud(Finchley版本)系列教程(二) 客户端负载均衡Ribbon.md' },
                      { text: 'Spring Cloud(Finchley版本)系列教程(三) 服务消费者(OpenFeign)', link: '/Spring Cloud(Finchley版本)系列教程/Spring Cloud(Finchley版本)系列教程(三) 服务消费者(OpenFeign).md' },
                      { text: 'Spring Cloud(Finchley版本)系列教程(四) 断路器(Hystrix)', link: '/Spring Cloud(Finchley版本)系列教程/Spring Cloud(Finchley版本)系列教程(四) 断路器(Hystrix).md' },
                      { text: 'Spring Cloud(Finchley版本)系列教程(五) 服务网关(Zuul)', link: '/Spring Cloud(Finchley版本)系列教程/Spring Cloud(Finchley版本)系列教程(五) 服务网关(Zuul).md' },
                    ]
              },
                {
                    text: 'Spring Cloud(Finchley版本)系列教程',
                    children:
                        [
                            { text: 'Spring Cloud(Kilburn 2022.0.2版本)系列教程(一) 服务注册与发现(eureka)', link: '/Spring Cloud(Kilburn 2022.0.2版本)系列教程/Spring Cloud(Kilburn 2022.0.2版本)系列教程(一) 服务注册与发现(eureka).md' },
                            { text: 'Spring Cloud(Kilburn 2022.0.2版本)系列教程(二) 服务消费者(RestTemplate+Loadbalancer)', link: '/Spring Cloud(Kilburn 2022.0.2版本)系列教程/Spring Cloud(Kilburn 2022.0.2版本)系列教程(二) 服务消费者(RestTemplate+Loadbalancer).md' },
                            { text: 'Spring Cloud(Kilburn 2022.0.2版本)系列教程(三) 服务消费者(OpenFeign)', link: '/Spring Cloud(Kilburn 2022.0.2版本)系列教程/Spring Cloud(Kilburn 2022.0.2版本)系列教程(三) 服务消费者(OpenFeign).md' },
                            { text: 'Spring Cloud(Kilburn 2022.0.2版本)系列教程(四) 断路器(Resilience4JCircuitBreaker、RetryCircuitBreaker)', link: '/Spring Cloud(Kilburn 2022.0.2版本)系列教程/Spring Cloud(Kilburn 2022.0.2版本)系列教程(四) 断路器(Resilience4JCircuitBreaker、RetryCircuitBreaker).md' },
                            { text: '', link: '/Spring Cloud(Kilburn 2022.0.2版本)系列教程/' },
                        ]
                },
            ],

      },
      {
        text: '关于',
        link: '/about',
      },

    ],
  }),
  bundler: viteBundler(),
})
显示出来就是这个效果

一级菜单比较简单,说明一下吧。在navbar下增加一个关于的菜单
{
    text: '关于',
    link: '/about',
},
七、search-pro本地搜索
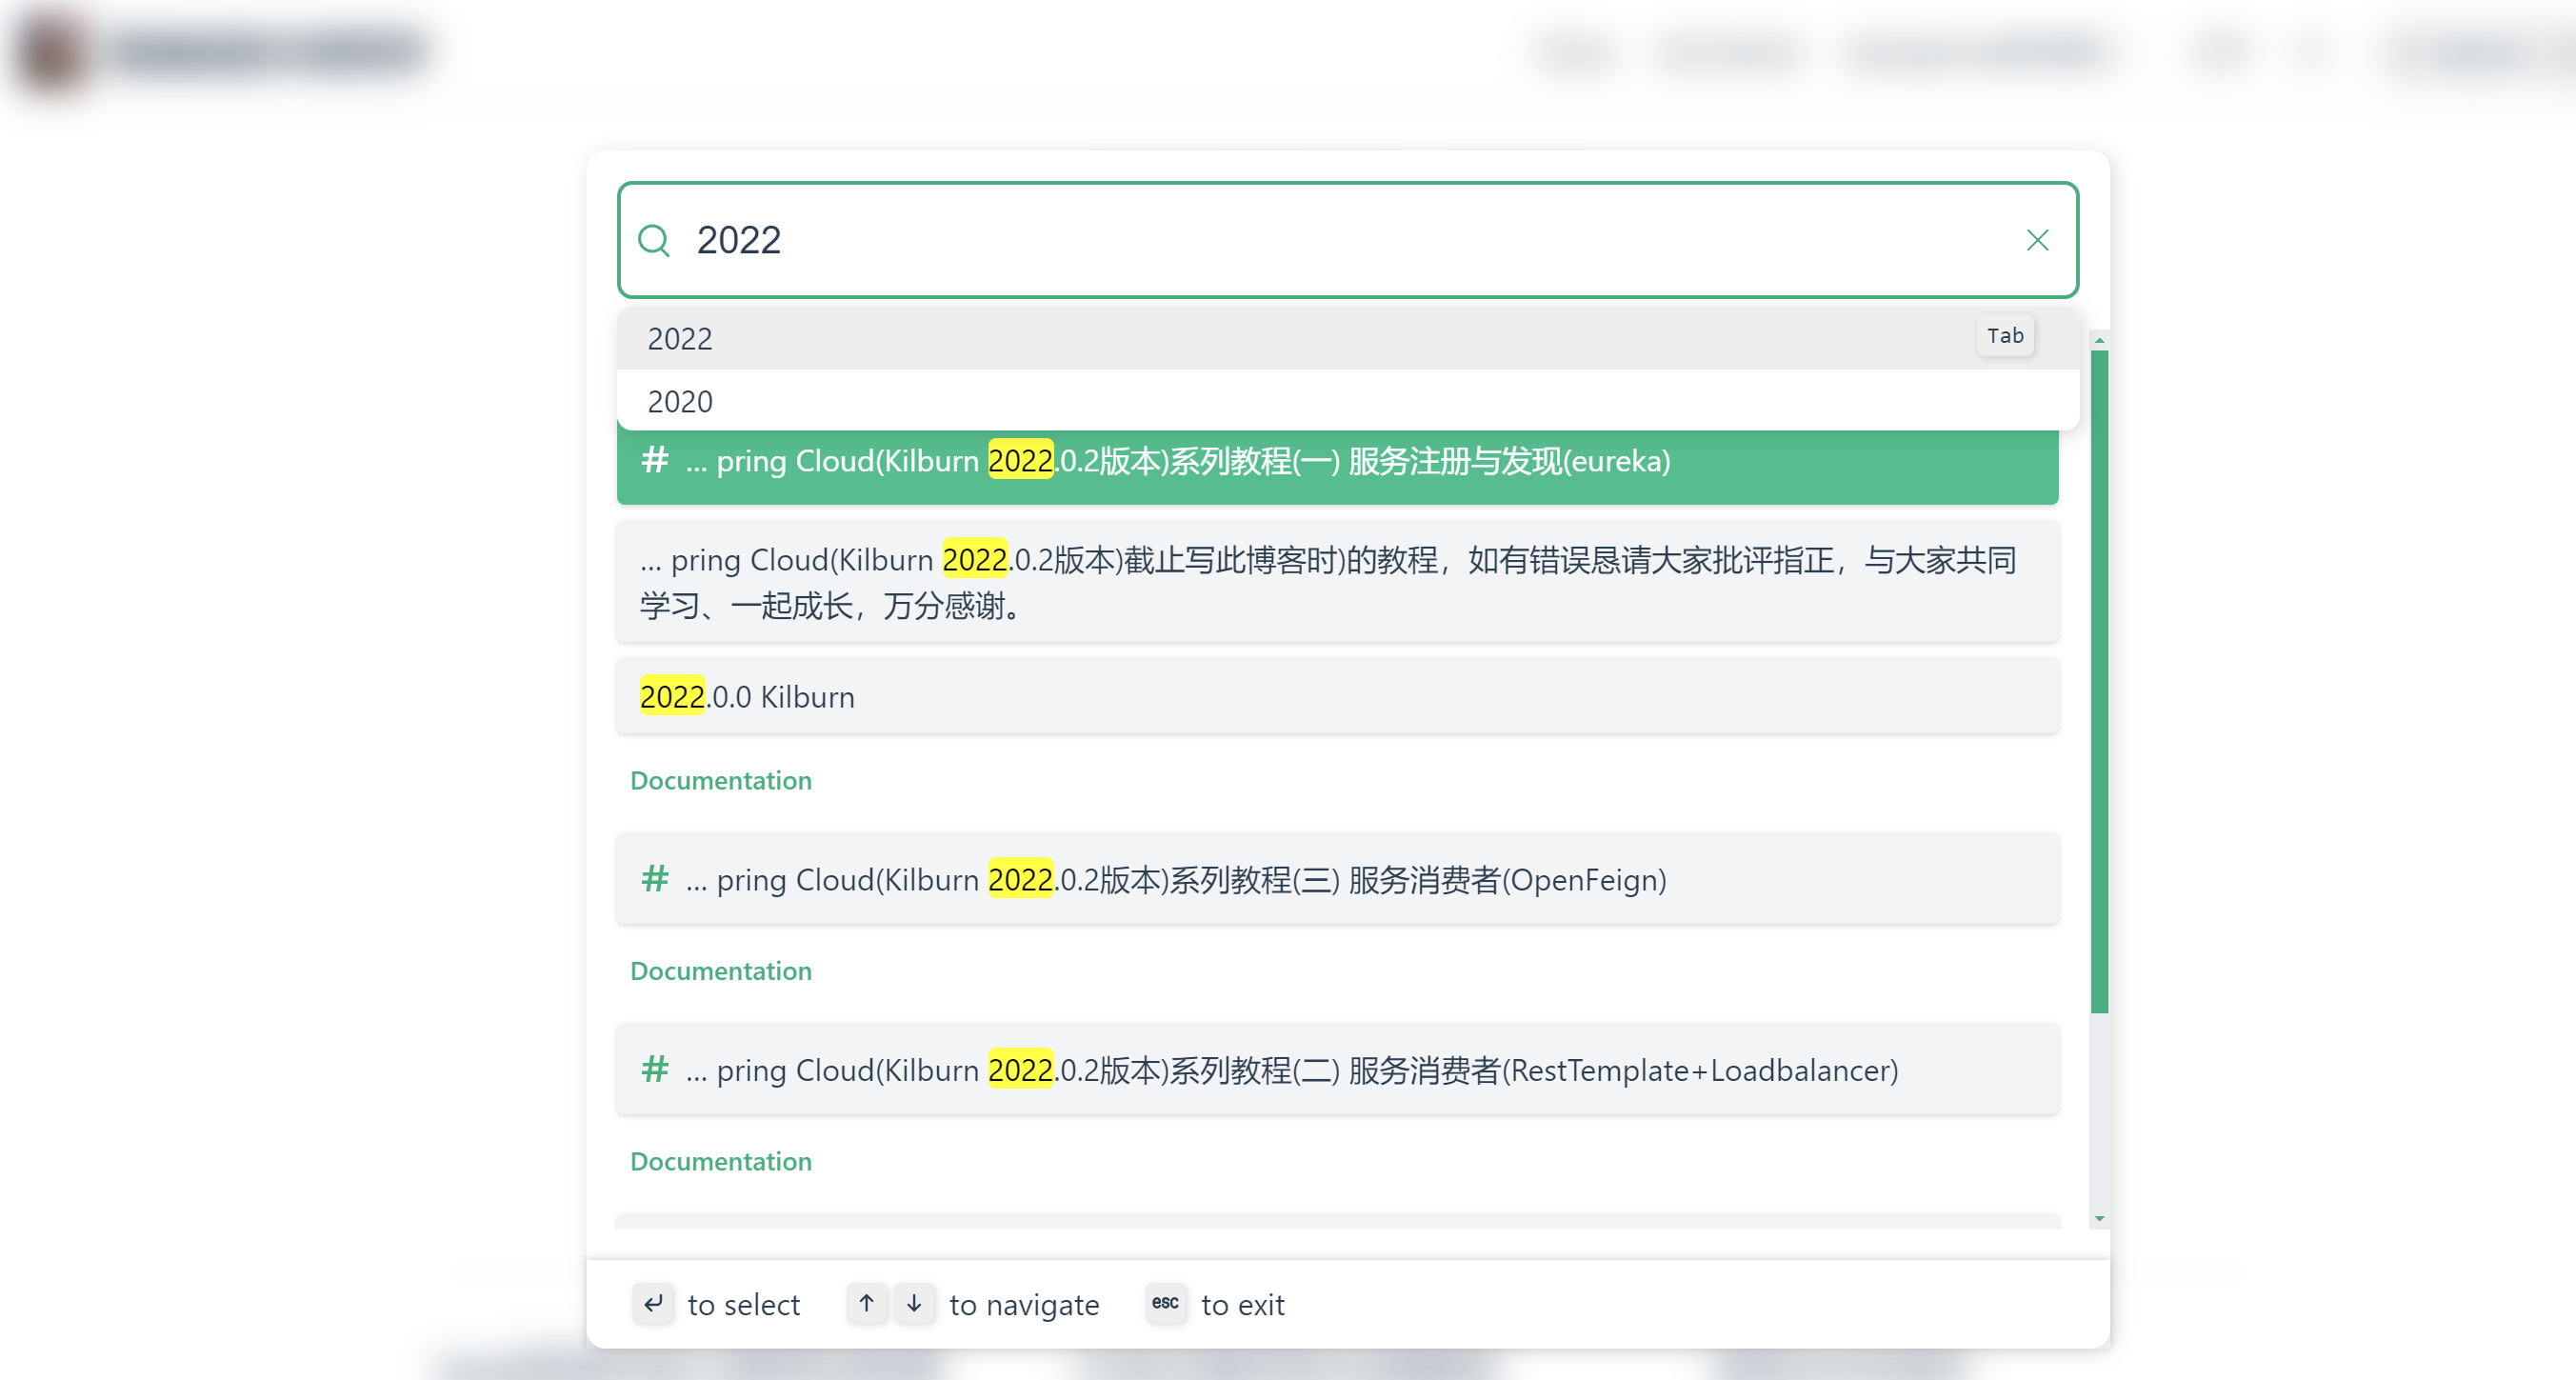
安装搜索插件
pnpm add -D vuepress-plugin-search-pro在config.js中导入包,并增加plugins配置
//写在config.js开头引入插件
import { searchProPlugin } from "vuepress-plugin-search-pro";

export default defineUserConfig({
    plugins: [
        searchProPlugin({
            indexContent: true,
            hotReload: true,
    }),
    ],
})
显示效果

八、部署
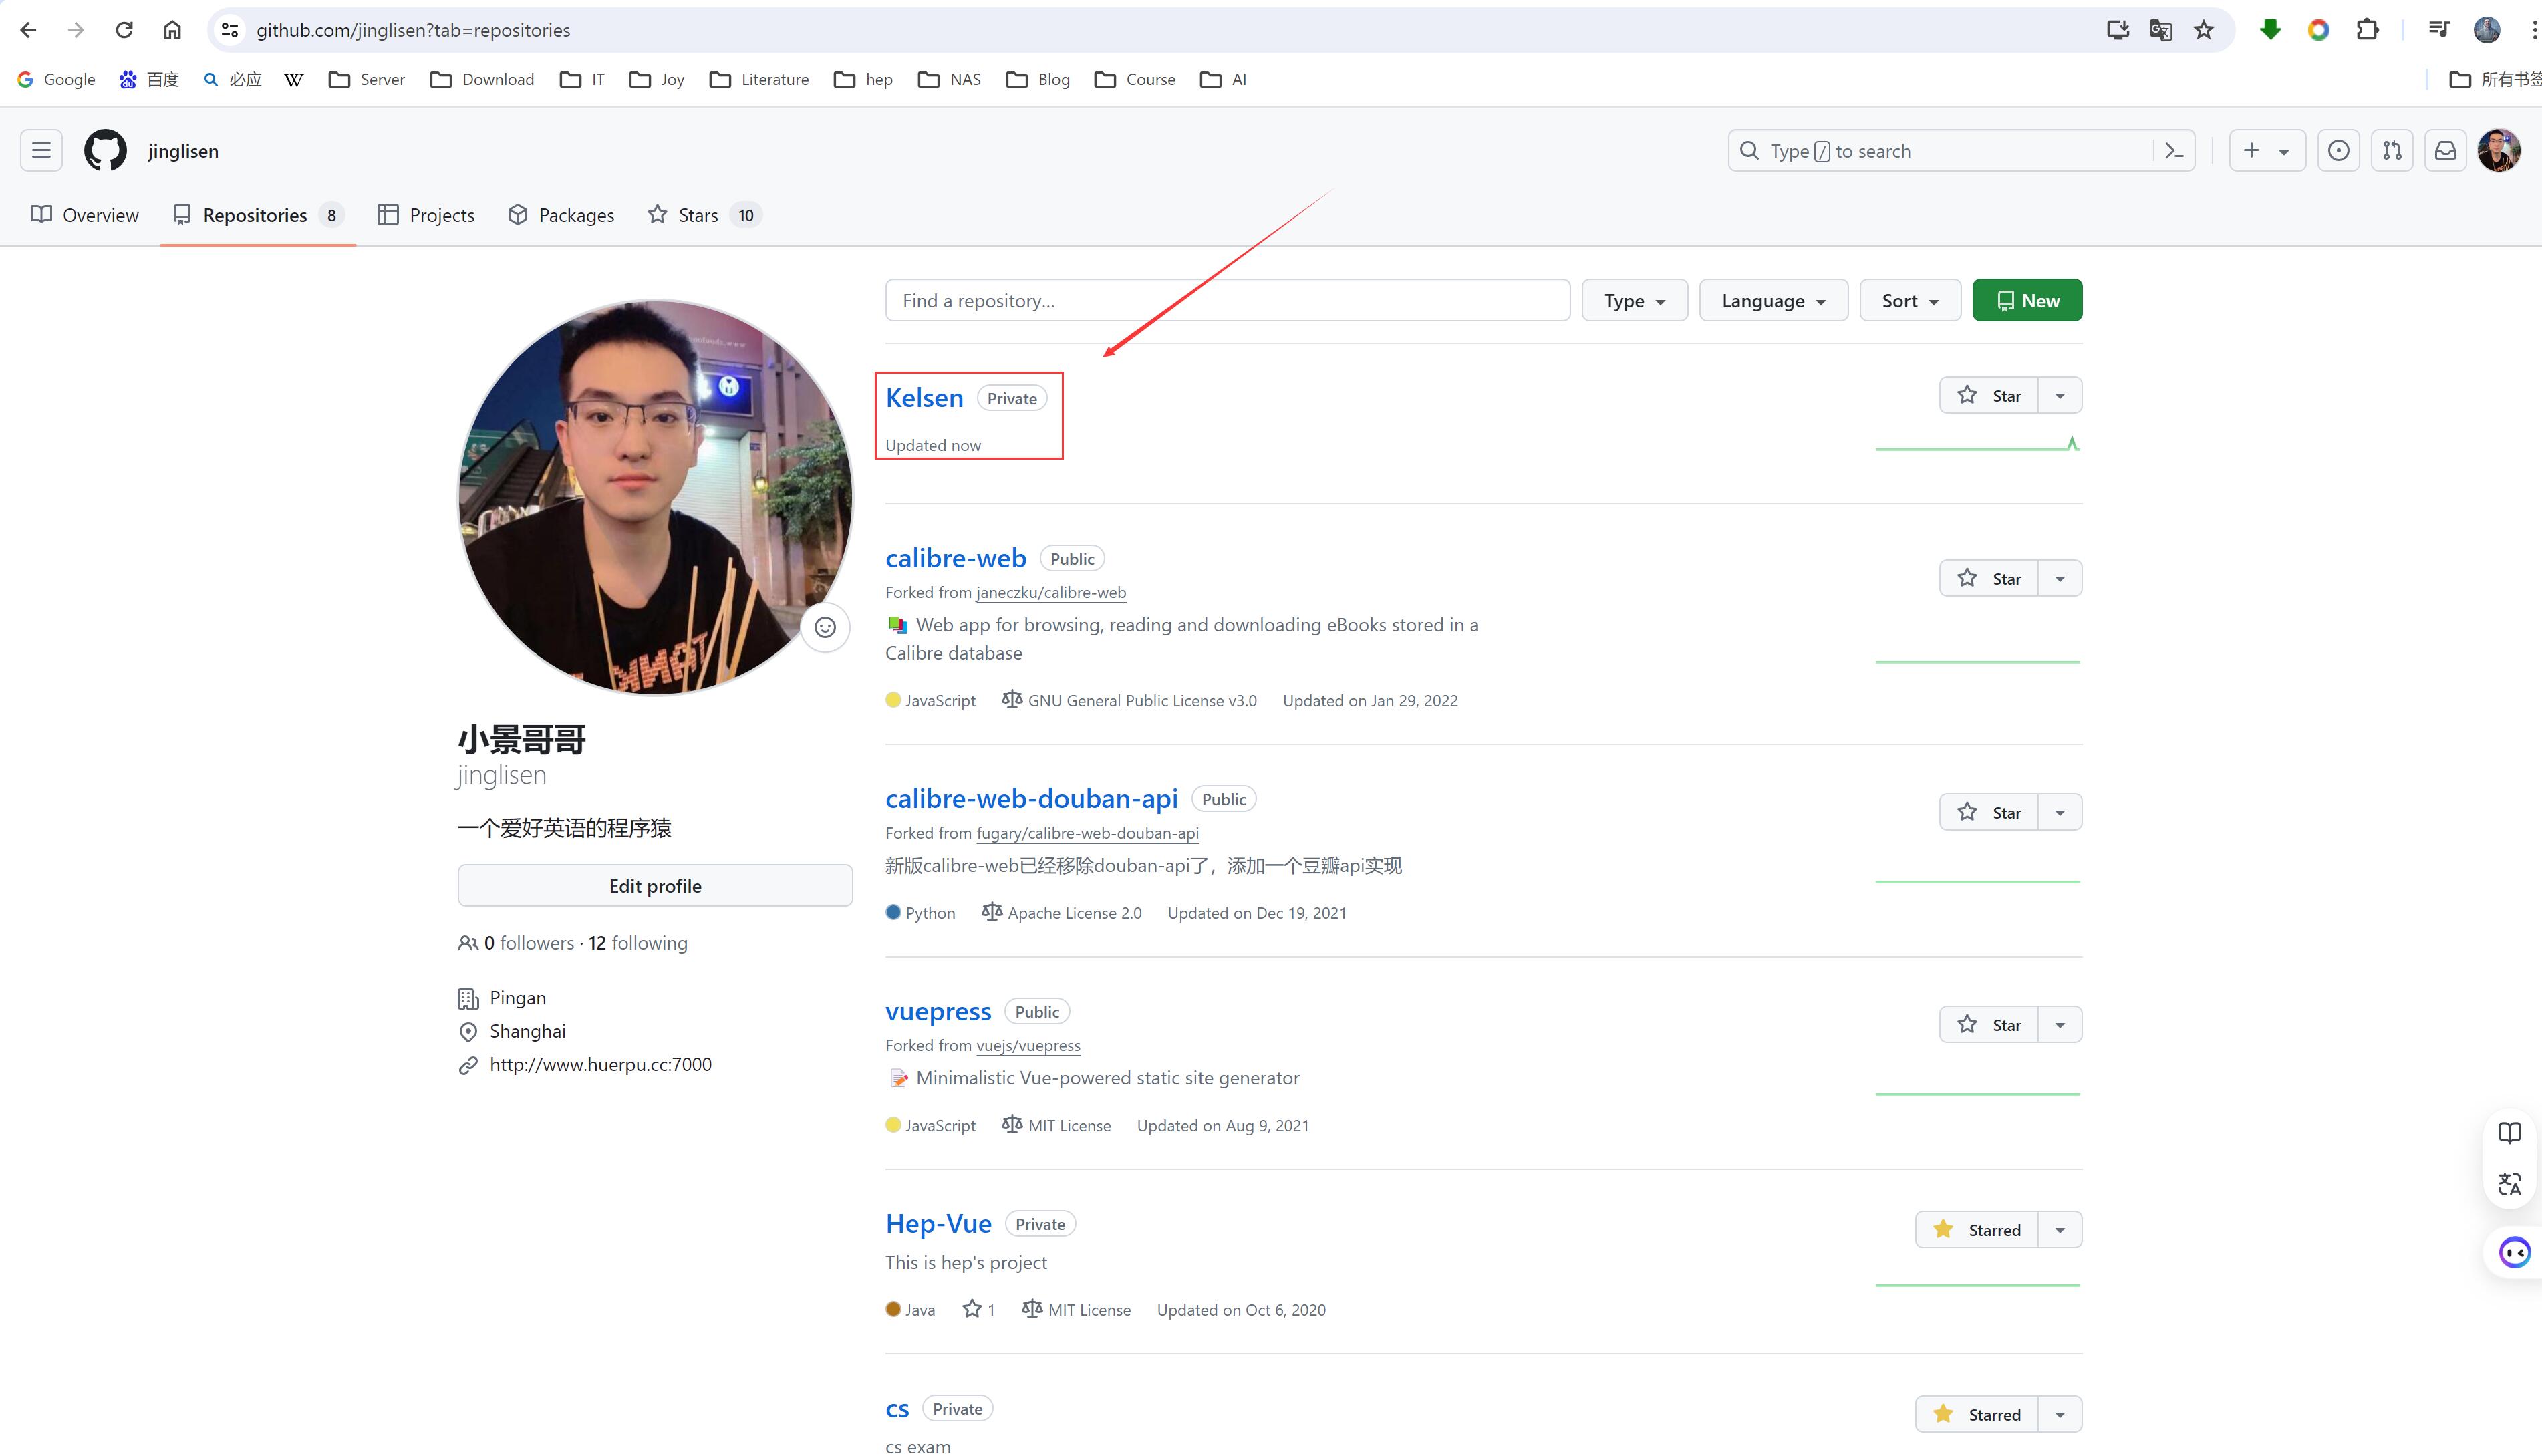
8.1 上传到github
通过idea分享项目到github
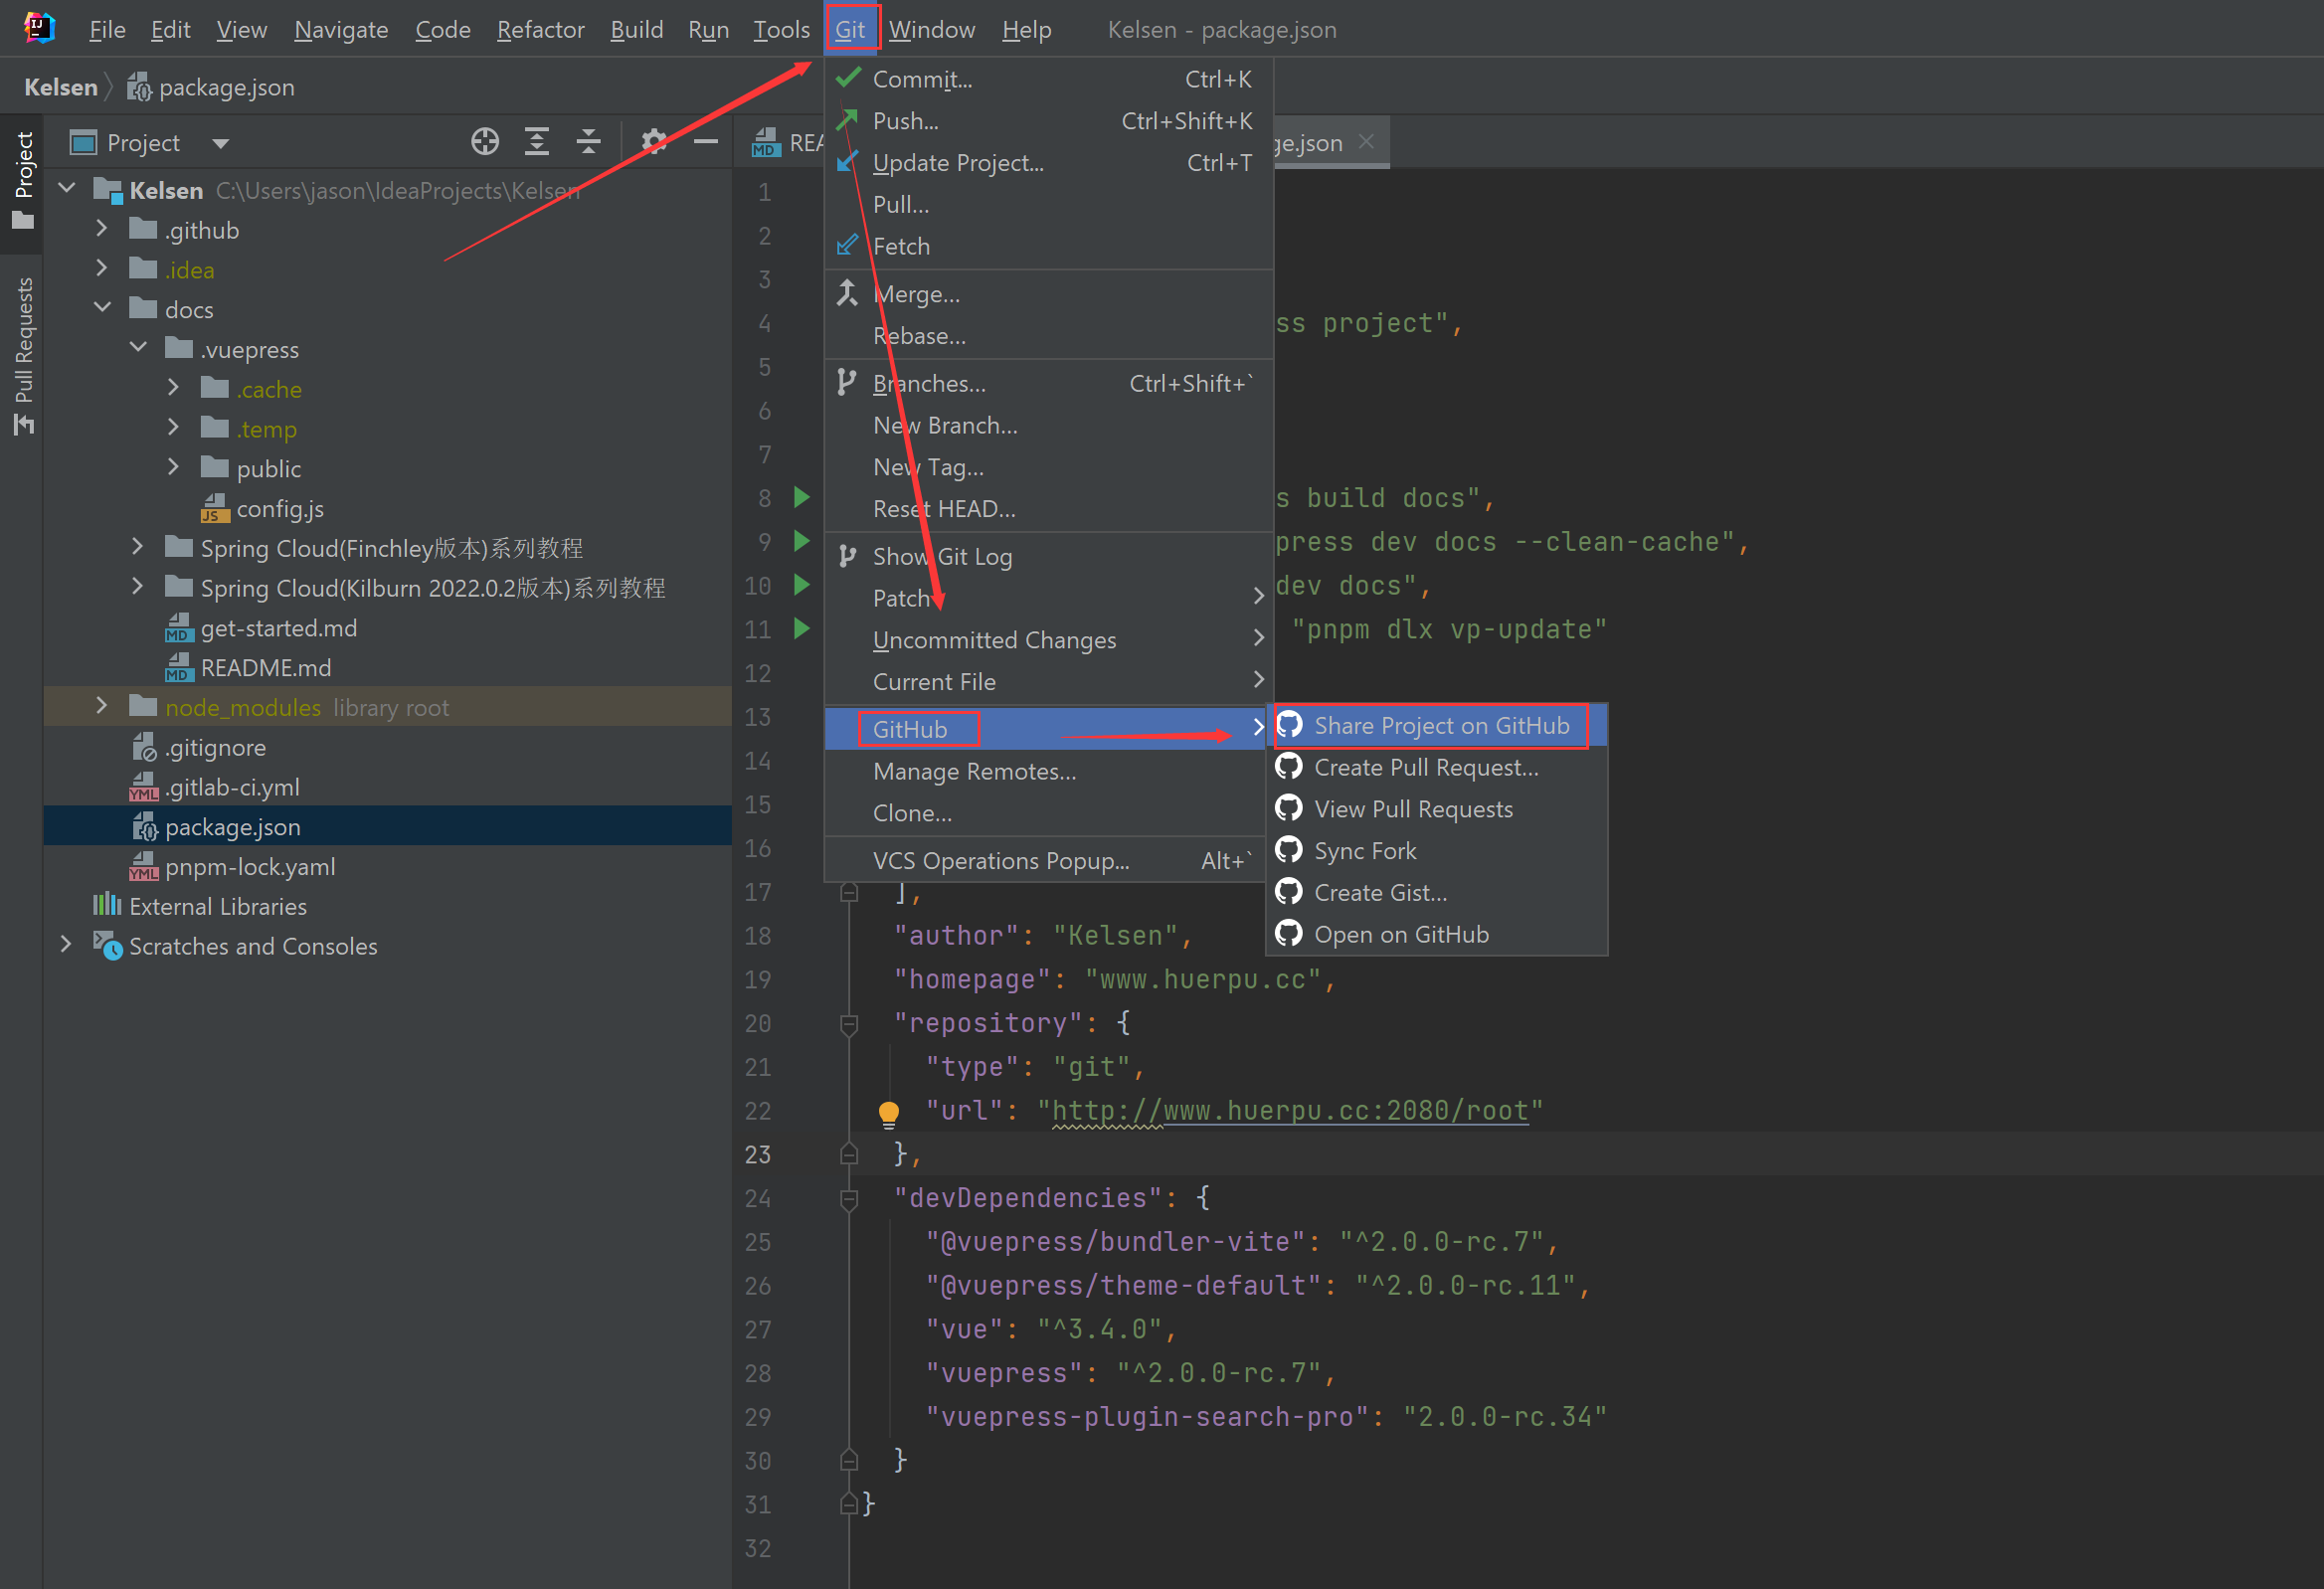
这里增加一个github账号,然后认证登录就好。

提交之后,github上就可以看到这个项目啦。
8.2 部署到github pages
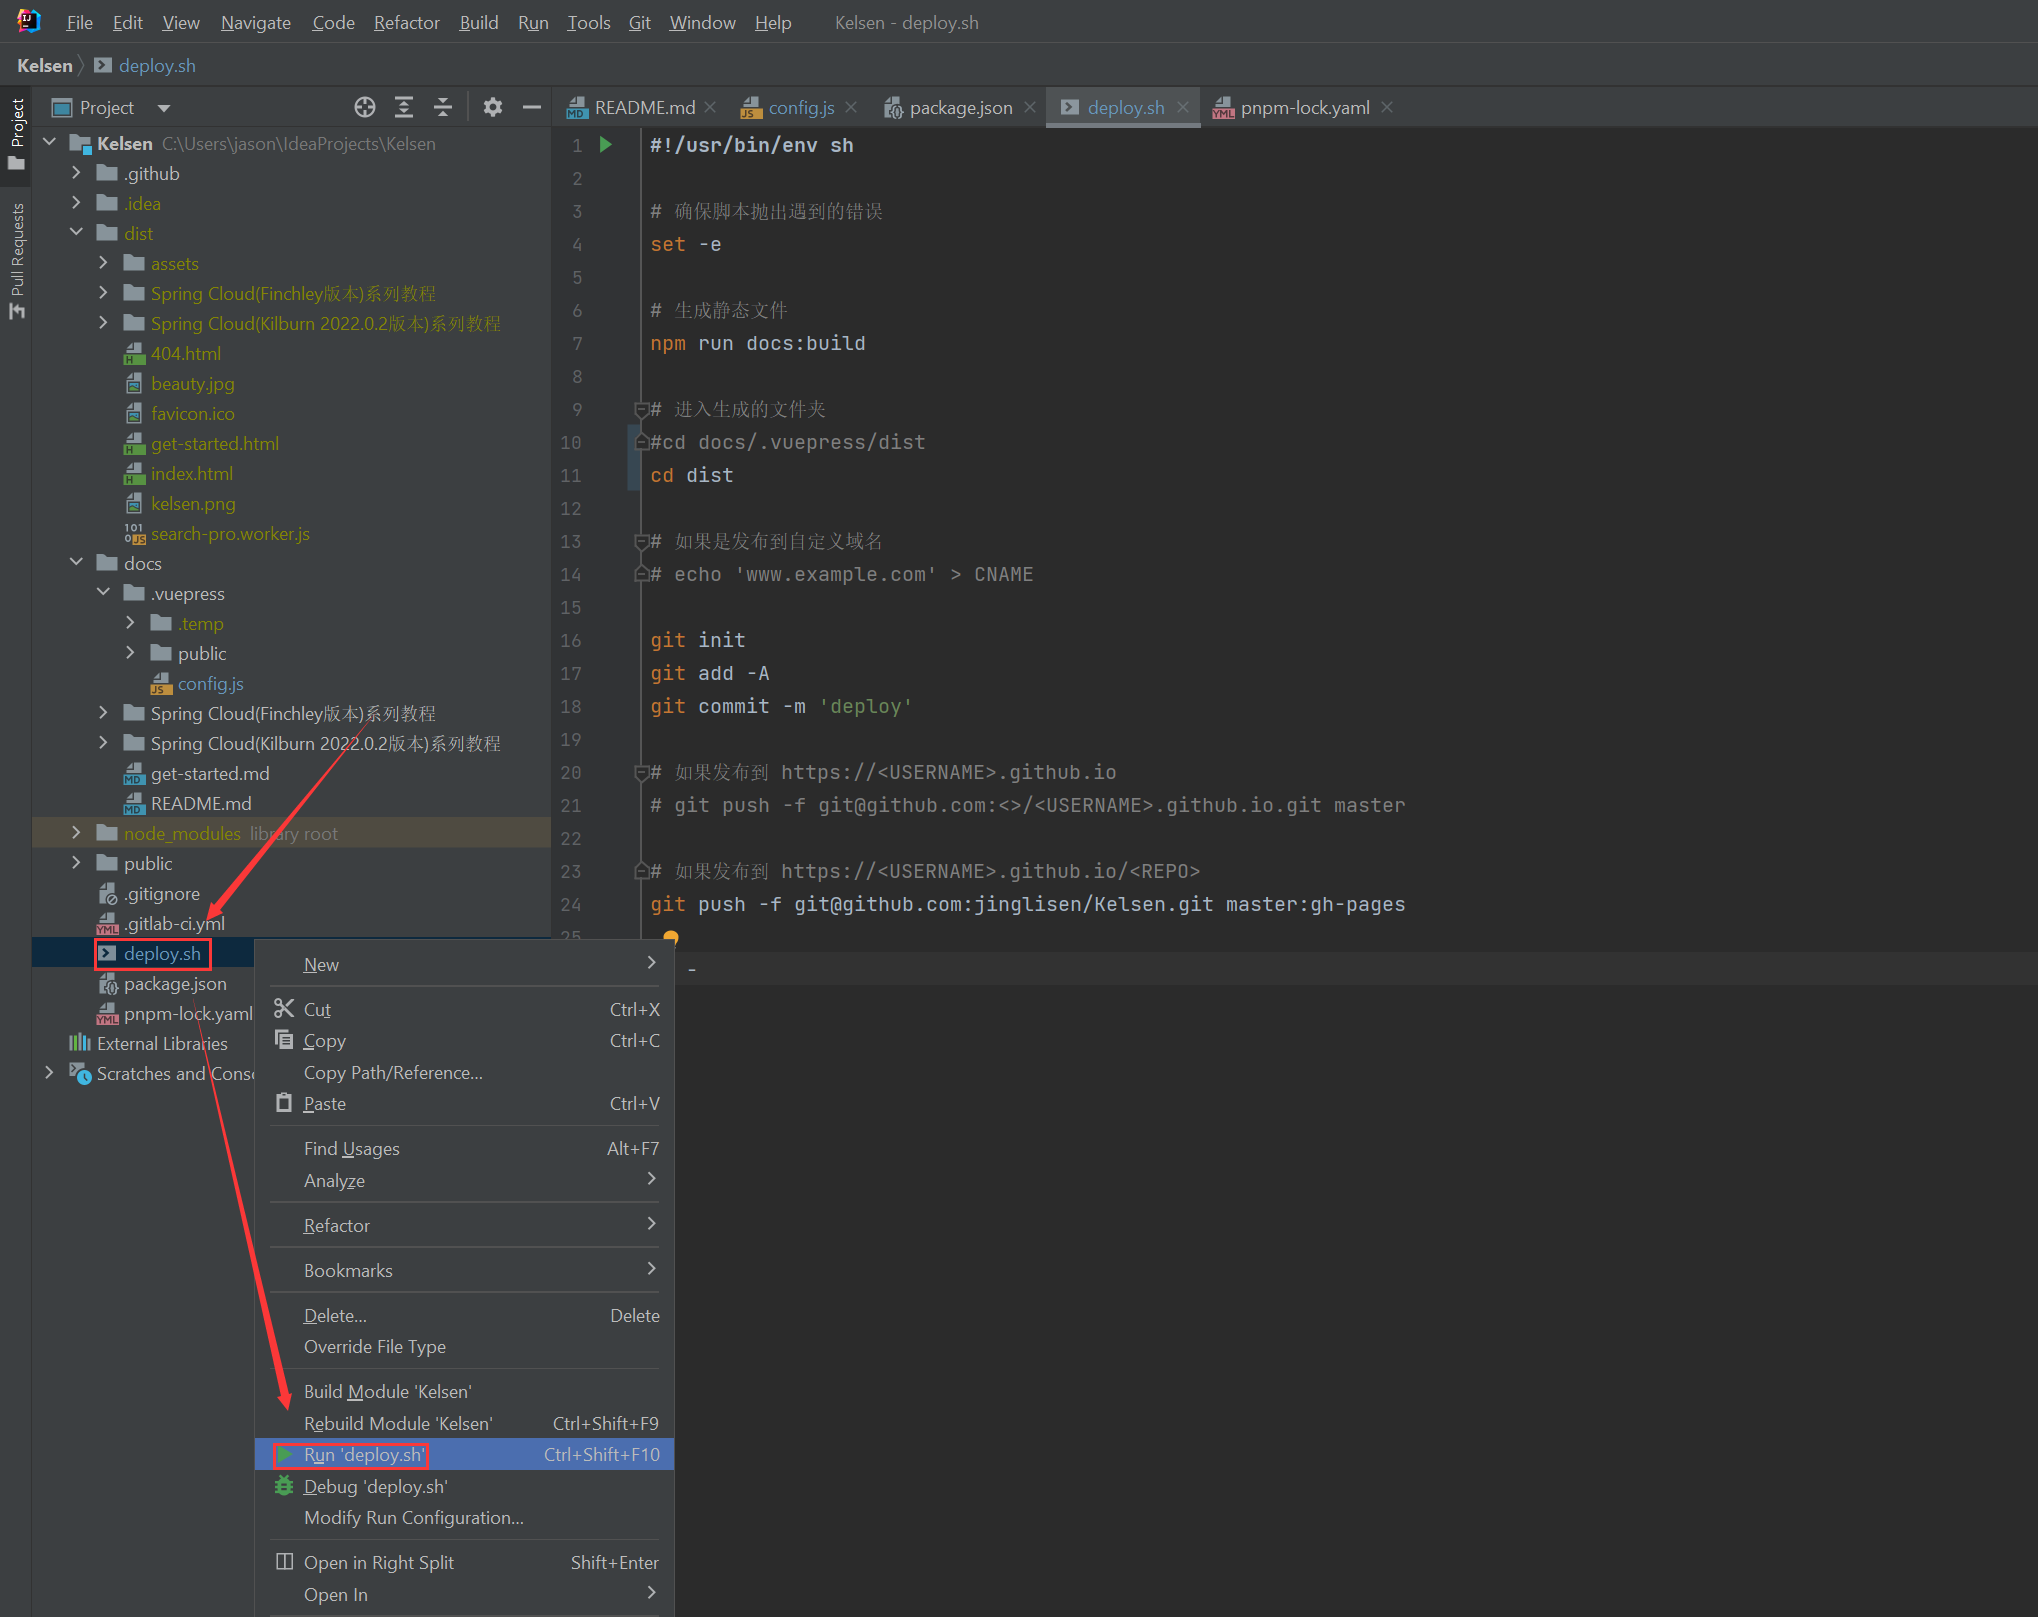
在项目根目录创建文件deploy.sh,其内容如下。
#!/usr/bin/env sh

# 确保脚本抛出遇到的错误
set -e

# 生成静态文件
npm run docs:build

# 进入生成的文件夹
#cd docs/.vuepress/dist
cd dist

# 如果是发布到自定义域名
# echo 'www.example.com' > CNAME

git init
git add -A
git commit -m 'deploy'

# 如果发布到 https://<USERNAME>.github.io
# git push -f git@github.com:<>/<USERNAME>.github.io.git master

# 如果发布到 https://<USERNAME>.github.io/<REPO>
git push -f git@github.com:jinglisen/Kelsen.git master:gh-pages

cd -
上面文件中,我们有配置生成的文件夹为dist,所以在config.js中增加下面一条路径指定。
export default defineUserConfig({
dest: 'dist',
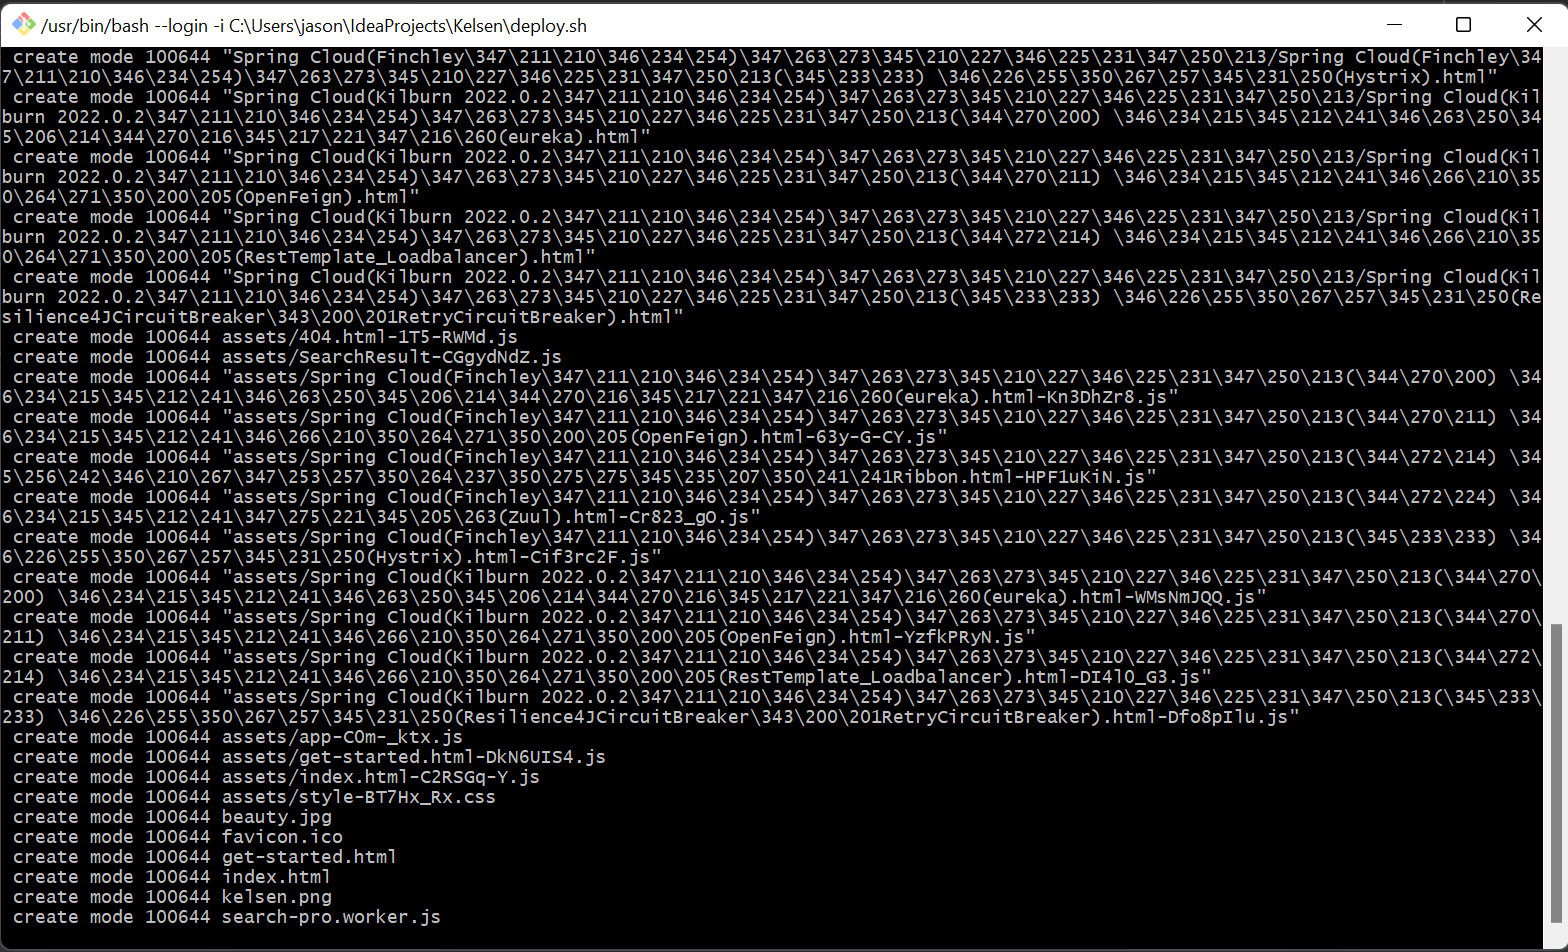
})运行deploy.sh
可以看到在生成静态文件以及上传中。
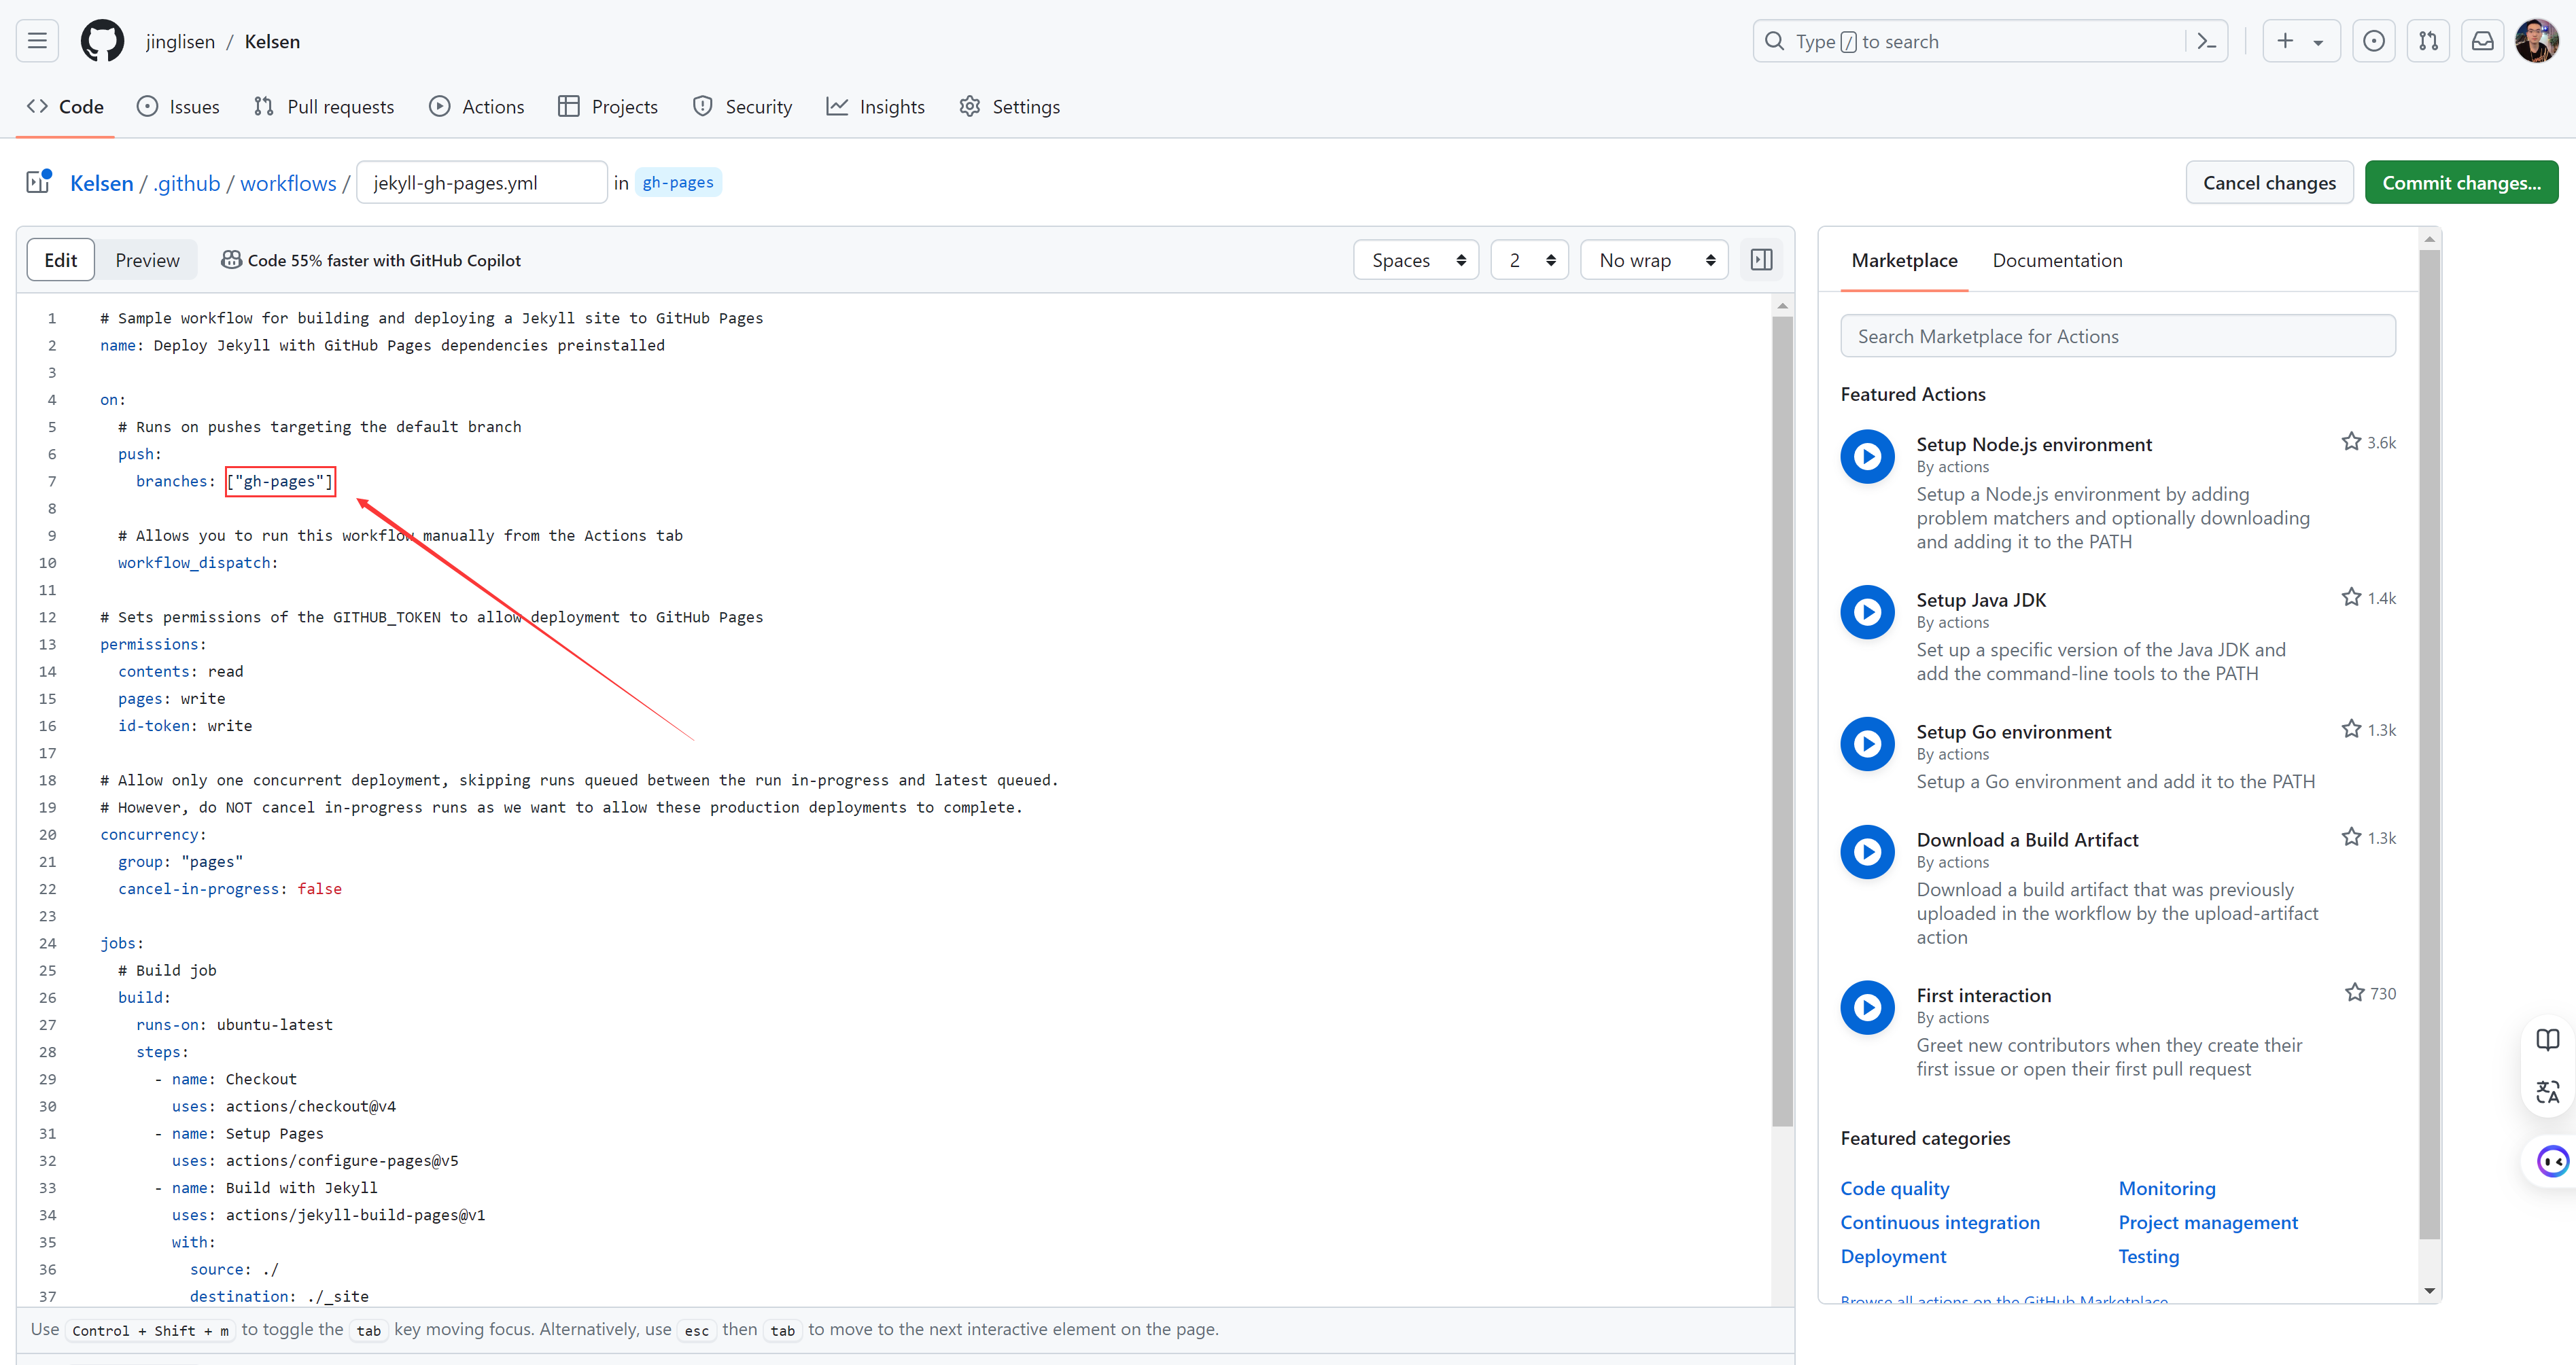
新建一个GitHub Action

这里只需要保持和deploy.sh中push的分支一样就好。其余默认,点击提交。
然后返回settings的pages,点击https://jinglisen.github.io/Kelsen/就可以访问到了。

页面展示就是这样子的,域名地址为https://jinglisen.github.io/Kelsen/。

8.3 自定义域名访问
在deploy.sh中增加echo 'kelsen.huerpu.cc' > CNAME。
#!/usr/bin/env sh

# 确保脚本抛出遇到的错误
set -e

# 生成静态文件
npm run docs:build

# 进入生成的文件夹
#cd docs/.vuepress/dist
cd dist

# 如果是发布到自定义域名
echo 'kelsen.huerpu.cc' > CNAME

git init
git add -A
git commit -m 'deploy'

# 如果发布到 https://<USERNAME>.github.io
# git push -f git@github.com:<>/<USERNAME>.github.io.git master

# 如果发布到 https://<USERNAME>.github.io/<REPO>
git push -f git@github.com:jinglisen/Kelsen.git master:gh-pages

cd -在域名解析增加一条CNAME的记录,主机记录为kelsen,也就是二级域名,记录值指向jinglisen.github.io。
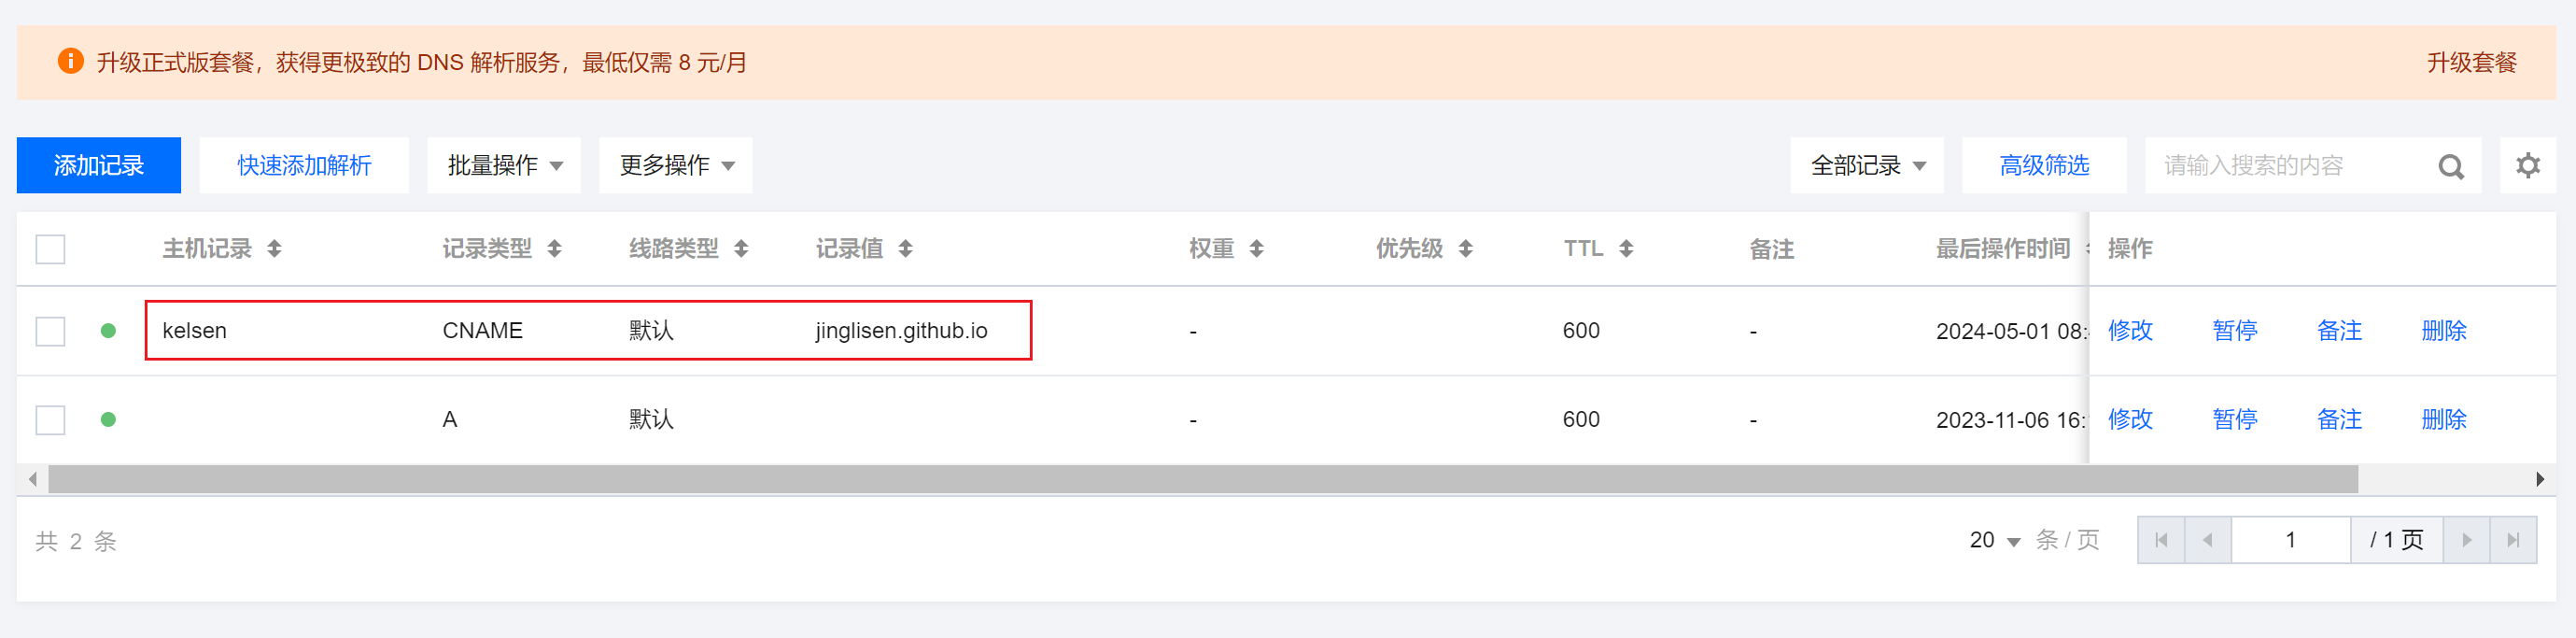
在项目的settings中,增加自定义域名kelsen.huerpu.cc,添加之后检测DNS check successful。

访问https://kelsen.huerpu.cc/,可以看到样式都乱掉了,别慌,我们修改一下base。
在config.js中修改base: '/',然后重新deploy发布。
8.4 部署到Ubuntu服务器
sudo su -

apt install  net-tools -y

apt install ssh

cd /usr

mkdir software

chmod -R 777 software

apt install unzip

unzip dist.zip

mv dist/ kelsen/

chmod -R 777 kelsen

#安装nginx
apt install nginx-core -y
#查看nginx版本
nginx -v
#启动nginx
service nginx start
#停止nginx
service nginx stop
#开放80端口,nginx默认端口
ufw allow 80

# 打开默认的 nginx 配置文件
vim /etc/nginx/sites-available/default

#前端访问地址
location / {
                # First attempt to serve request as file, then
                # as directory, then fall back to displaying a 404.
                root /usr/software/kelsen;
                index index.html index.htm;
                try_files $uri $uri/ =404;
}
输入IP地址,可以访问到vuepress部署到Ubuntu首页面。
8.5 内网穿透域名访问
因为我有一台阿里云主机,有做内网穿透,所以直接在frpc.ini中增加一条记录
[hep-vuepress]
type = tcp
local_ip = 192.168.31.116
local_port = 80
remote_port = 80
在阿里云主机安全规则中,放行80端口。
访问http://www.huerpu.cc/即可访问到博客主页啦。

如果你拷贝了别人的vuepress项目,进入项目文件夹执行npm install进行依赖的安装即可,否则会报错。
参考教程passwordgloo https://blog.csdn.net/passwordgloo/article/details/129114625
vuepress2官方使用文档 https://v2.vuepress.vuejs.org/zh/guide/configuration.html