五、docker安装oracle11g服务器,并使用Navicat远程连接
首先说明一下oracle安装比较繁琐,网上有个大神基于centos6.5装了oracle11g并上传了镜像,这个使用起来还是挺方便的。这个镜像比较大,安装需要的空间也比较大,所以在安装之前一定要确保磁盘空间够用。
1、最简单的方式,直接docker run
最简单的方式就是直接拉取镜像,然后run就行。
#拉取镜像
docker pull xiaofeng68/db_oracle11g:latest

#启动容器
docker run -d -p 1521:1521 --name oracle11g xiaofeng68/db_oracle11g:latest

#进入容器
docker exec -it oracle11g bash
这个方式的缺点很明显,可能里面有很多软件需要更新,没有ssh可以远程连接的设置,想增加额外的软件都需要手工安装,启动之后好像yum源还有问题,不能直接yum装软件。
2、使用Dockerfile启动oracle11g
我根据他这个镜像写了个dockerfile,更新了源,并且自动安装了vim、ssh等,当然你可以根据自己需要再装一些别的软件。
# 基础景象
FROM xiaofeng68/db_oracle11g:latest
# 镜像制作信息
LABEL maintainer="JingLisen"

USER root

#把setup.sh文件拷贝到容器中,并赋予可执行权限
COPY ./setup.sh /
RUN chmod a+x /setup.sh

#执行setup.sh这个脚本
RUN /bin/bash -c "source /setup.sh"

RUN yum update -y
RUN yum install vim -y
RUN yum install openssh-server -y
RUN echo PermitRootLogin yes >> /etc/ssh/sshd_config
RUN echo service sshd start >> /root/.bashrc

USER oracle
# 开放端口
EXPOSE 1521 22
setup.sh文件和Dockerfile文件在同一目录下,其内容如下:
#!/bin/bash
echo export ORACLE_HOME=/home/oracle/app/oracle/product/11.2.0/dbhome_2 >> /etc/profile;
echo export ORACLE_SID=heporacle11g >> /etc/profile;
echo export PATH=$ORACLE_HOME/bin:$PATH >> /etc/profile;
#使文件生效
source /etc/profile;
#设置源
wget -O /etc/yum.repos.d/CentOS-Base.repo http://file.kangle.odata.cc/repo/Centos-6.repo;
wget -O /etc/yum.repos.d/epel.repo http://file.kangle.odata.cc/repo/epel-6.repo;
yum makecache;
因为编译时间比较长,所以在build的时候耐心等待一下哈。
#强制移除oracle容器:docker rm -f  + containerID或者名称
docker rm -f oracle11g

#生成镜像
docker build -t oracle11g .

#启动容器
docker run -d -p 1521:1521 -p 1660:22 --name oracle11g oracle11g

#进入容器
docker exec -it oracle11g bash
这时候呢,已经可以开机自启动ssh并且开放22端口到宿主机的1660,但是这个dockerfile写的并不怎么样,虽然实现了启动oracle的功能,因为RUN的次数太多了,每RUN一次镜像就增加一层,这个镜像的文件就越来越大。那么我们来优化一下,把一些RUN的命令合并一下。
3、优化Dockerfile
dockerfile只是执行一个初始化的脚本setup.sh,其余命令我们都移动到setup.sh的里面来执行,这个设置看起来就特别清爽了,而且dockerfile里面只RUN了一次。
# 基础景象
FROM registry.cn-hangzhou.aliyuncs.com/helowin/oracle_11g
# 镜像制作信息
LABEL maintainer="JingLisen"

USER root

#把setup.sh文件拷贝到容器中,并赋予可执行权限,然后执行setup.sh这个脚本
COPY ./setup.sh /
RUN chmod a+x /setup.sh && \
    /bin/bash -c "source /setup.sh"

USER oracle
# 开放端口
EXPOSE 1521 22
这里是setup.sh的shell脚本,把所有命令都挪到这里来了。
#!/bin/bash
echo export ORACLE_HOME=/home/oracle/app/oracle/product/11.2.0/dbhome_2 >> /etc/profile;
echo export ORACLE_SID=helowin >> /etc/profile;
echo export PATH=$ORACLE_HOME/bin:$PATH >> /etc/profile;
#使文件生效
source /etc/profile;

#设置源
wget -O /etc/yum.repos.d/CentOS-Base.repo http://file.kangle.odata.cc/repo/Centos-6.repo;
wget -O /etc/yum.repos.d/epel.repo http://file.kangle.odata.cc/repo/epel-6.repo;
yum makecache;

#更新
yum update -y;

#安装vim
yum install vim -y;

#安装ssh
yum install openssh-server -y;

#安装net-tools
yum install net-tools -y;

#设置root可以ssh登录
echo PermitRootLogin yes >> /etc/ssh/sshd_config;

#设置开机自启动ssh
echo service sshd start >> /root/.bashrc;
编译并启动容器
#强制移除oracle容器:docker rm -f  + containerID或者名称
docker rm -f oracle11g

#生成镜像
docker build -t oracle11g .

#启动容器
docker run -d -p 1521:1521 -p 1660:22 --name oracle11g  -v /home/jason/Desktop/oracle:/u01/app/oracle/  oracle11g

#进入容器
docker exec -it oracle11g bash
编译和启动容器成功的截图,给大家看一下:

4、设置oracle
#vi修改profile文件,增加下面三个值。注意首先要切换到root用户,root用户的默认密码为helowin
vim /etc/profile;
#增加这三项这个我们已经在setup.sh中做过了,这里只是检查一下
export ORACLE_HOME=/home/oracle/app/oracle/product/11.2.0/dbhome_2
export ORACLE_SID=helowin
export PATH=$ORACLE_HOME/bin:$PATH

#使文件生效
source /etc/profile;

su root
helowin
#创建软连接,类似windows的快捷方式,这样进入Docker就能方便运行sqlplus
ln -s $ORACLE_HOME/bin/sqlplus /usr/bin

#切换到Oracle用户
su - oracle

#登录sqlplus并修改sys、system用户密码,当然也可以创建用户,这里创建了jason用户并授权
sqlplus /nolog
conn /as sysdba

#修改system和sys账号密码
alter user system identified by system;
alter user sys identified by sys;

#创建一个Jason账号
create user jason identified by jason;
grant connect,resource,dba to jason;

#修改密码规则策略为永不过期
ALTER PROFILE DEFAULT LIMIT PASSWORD_LIFE_TIME UNLIMITED;

#O7_DICTIONARY_ACCESSIBILITY是用来控制select any table权限是否可以访问data dictionary的,主要用来保护数据字典
alter system set O7_DICTIONARY_ACCESSIBILITY=true scope=spfile;
commit;
宿主机开放一下1521端口,我的是ubuntu,使用命令ufw allow 1521。
5、配置Navicat Premium并连接
这个版本的Oracle是11.2.0.3.0,所以下载instant Client的时候注意版本。可以从Oracle官网下载,当然也可百度自行下载,很容易找到。为了方便起见,我还是给小白个连接吧。
我自己的群晖下载地址:http://www.huerpu.cc:5000/sharing/jSPYI6ecW
傻瓜式一路下一步安装即可。
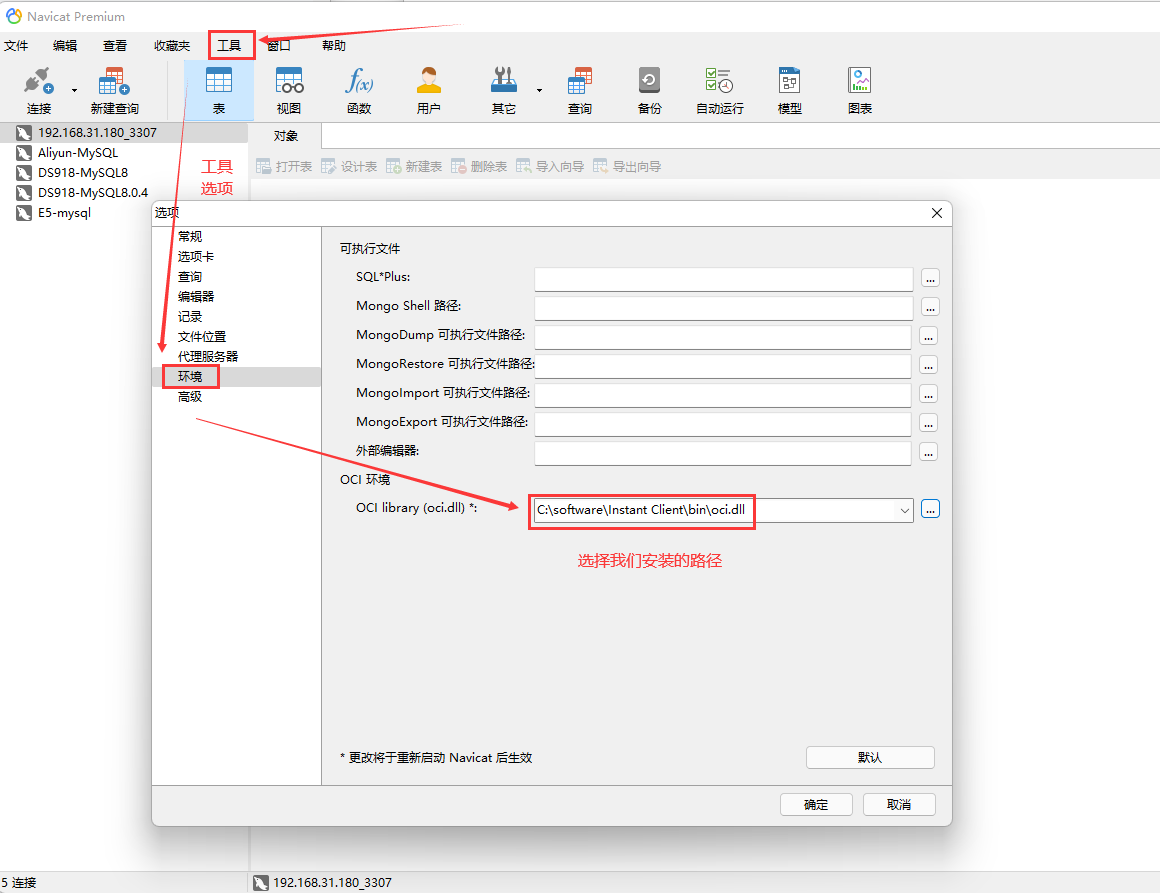
打开Navicat Premium配置OCI库的路径为刚刚安装的Instant Client的bin路径下的oci.dll。
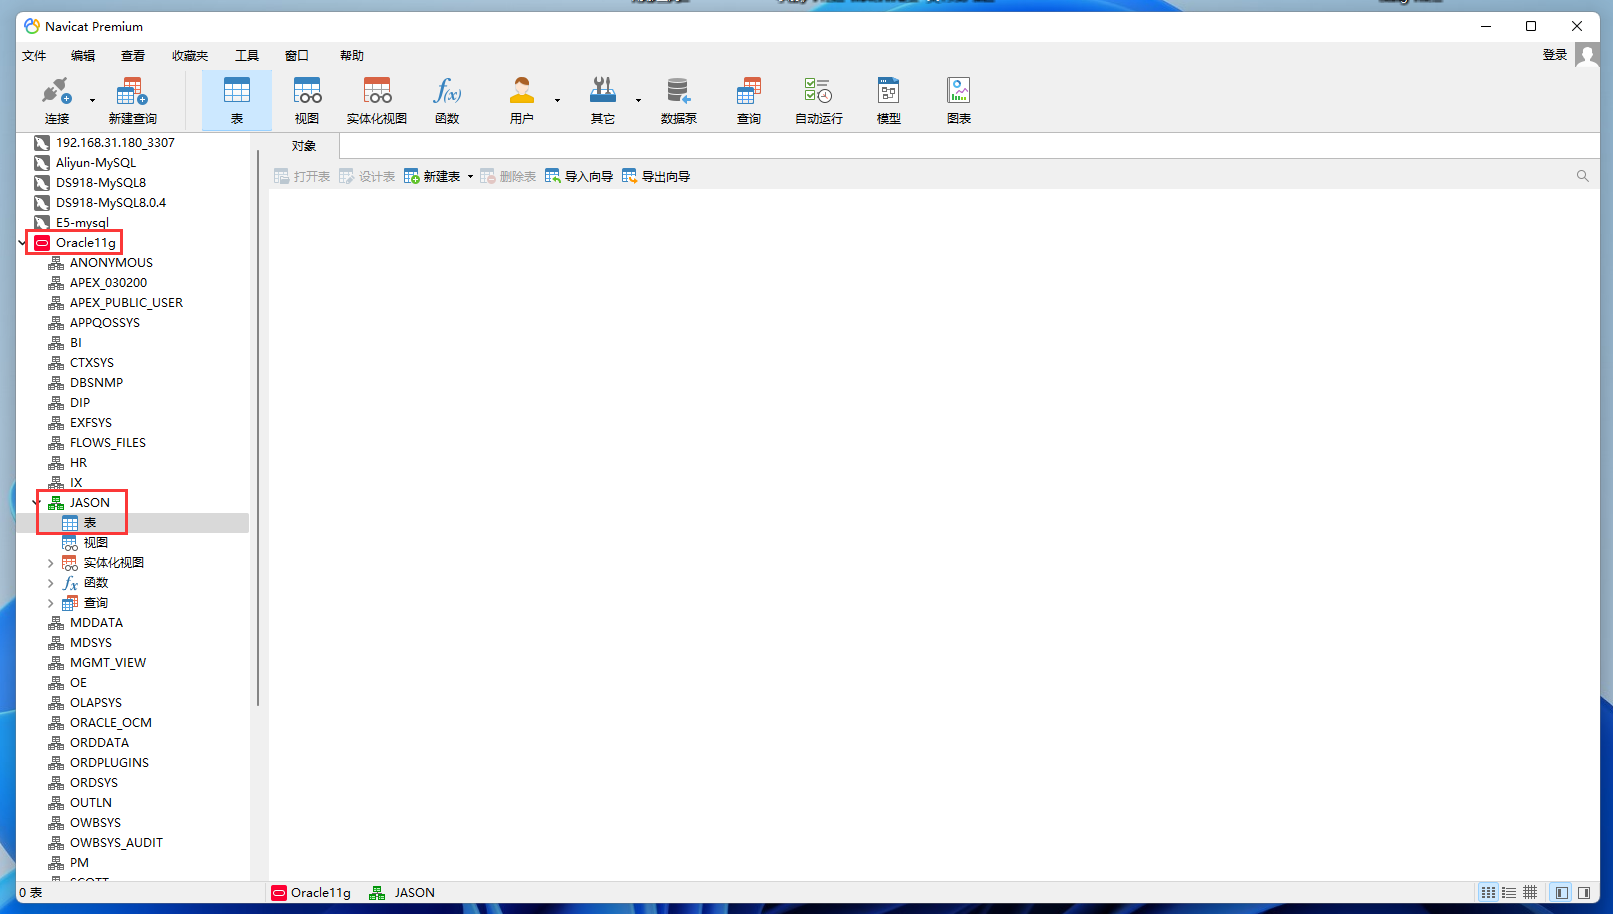
然后创建Oracle数据库连接,选择Oracle,设置相关参数连接即可。

然后就可以保存进行操作啦,enjoy it。
对于外网映射,我们这里就不做了,因为也就是开个端口号的事情,so easy。
备注
可能用到的命令
#查看运行中的容器
docker ps

#查看所有镜像
docker images;

#查看磁盘空间
df -hl

#强制移除镜像docker rmi -f + containerID或者名称
docker rmi -f oracle11g

#强制移除oracle容器docker rm -f  + containerID或者名称
docker rm -f oracle11g

#更新
yum update -y;

#安装vim
yum install vim -y;

#安装ssh
yum install openssh-server -y;

#切换到root账号,root用户的默认密码为helowin
su - root

#查看build信息
docker inspect xiaofeng68/db_oracle11g:latest;

#查看端口是否开放
netstat -ap | grep 22

#更改listener
alter system set local_listener="(address = (protocol = tcp)(host = localhost)(port = 1521))";

#重启lsnrctl
lsnrctl reload;